Peppermint meltaway cookies are literally called “meltaways” and I thought that was just marketing hype until I made them for the first time last December and honestly almost ate the entire batch myself before the Christmas party.
They actually melt in your mouth. Like, the name is accurate. Who knew?
Table of Contents
Why I Was Skeptical About These Melt in Your Mouth Christmas Cookies
So my coworker Jessica kept going on and on about these cookies her grandma makes every year. “They’re so light!” “They just dissolve on your tongue!” And I’m thinking yeah, okay, Jessica, calm down, they’re cookies.
Then she brought some to our office holiday potluck and I took one just to be polite.
Oh.
OH.
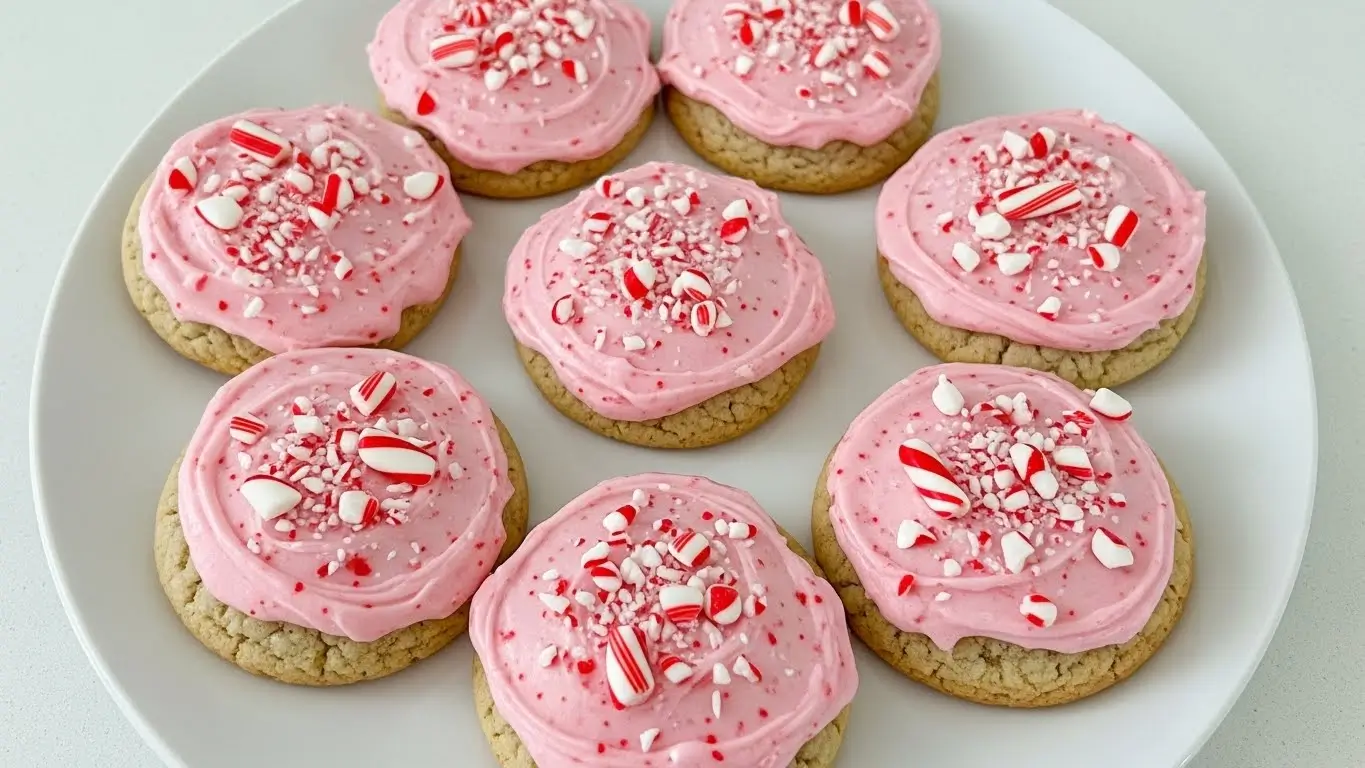
They’re like eating a buttery peppermint cloud. The texture is insane—soft, crumbly, but somehow not dry? And the pink peppermint frosting with the crushed candy canes on top makes them look so festive that people assume you went to culinary school.
I immediately asked for the recipe. Jessica said “oh I don’t have it, Grandma just makes them.” THANKS, JESSICA. Very helpful.
So I spent like three weeks trying different recipes online until I found the right combination. This is that recipe.
What Makes the Best Peppermint Meltaways Recipe Actually Work
Here’s the secret ingredient that confused me at first: cornstarch. Like, a LOT of cornstarch. That’s what gives these buttery shortbread peppermint cookies that melt-in-your-mouth texture instead of being regular cookie-texture.
The first batch I made, I thought “this can’t be right, there’s too much cornstarch” so I cut it in half. And guess what? They were just regular cookies. Good, but not meltaways. Follow the recipe. Use all the cornstarch. I learned this the hard way.
The key is—oh wait, I forgot to mention—you have to chill the dough. I know, I know. Everyone hates chilling cookie dough because we want cookies NOW. But these cookies are so soft and delicate that if you don’t chill the dough, they’ll spread into weird puddles in the oven and you’ll be sad.
Been there. Made cookie puddles. Very sad.
Ingredients for These Easy Peppermint Cookies with Frosting
For the cookies:
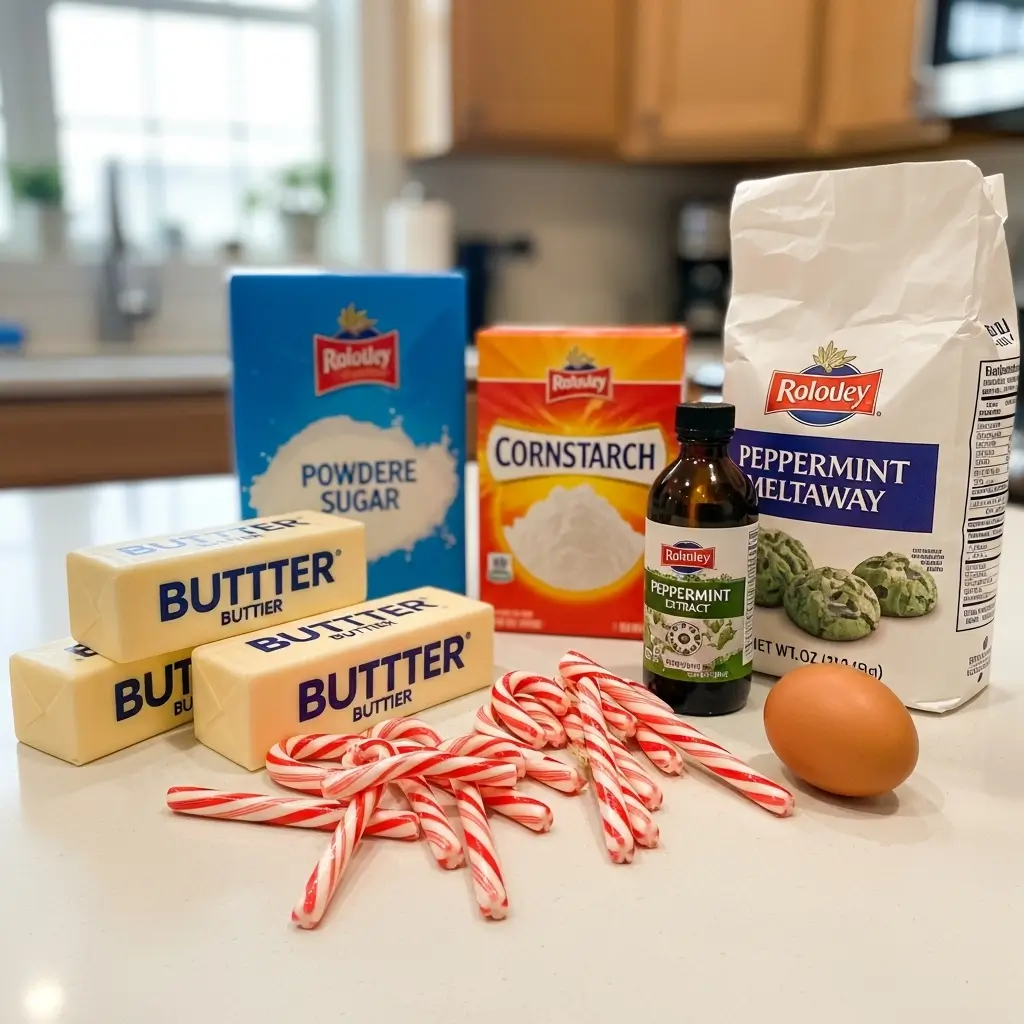
- 1 cup unsalted butter, softened (not melted, softened—leave it on the counter for an hour)
- 2/3 cup powdered sugar
- 1 egg yolk (just the yolk, save the white for scrambled eggs or whatever)
- 1 teaspoon vanilla extract
- 1/2 teaspoon peppermint extract (NOT peppermint oil, extract—I made that mistake once)
- 1 3/4 cups all-purpose flour
- 3/4 cup cornstarch (yes, really, this much)
- 1/4 teaspoon baking powder
- 1/4 teaspoon salt
For the peppermint buttercream:
- 1/2 cup unsalted butter, softened
- 2 1/2 cups powdered sugar
- 2-3 tablespoons milk
- 1/2 teaspoon peppermint extract
- Pink or red food coloring (optional but makes them pretty)
- 1/2 cup crushed candy canes or peppermint candies
Shopping for these ingredients is pretty straightforward except for one thing—those candy canes. I went to three different stores in late November trying to find regular candy canes and they were all sold out. Apparently everyone buys them early. Stock up when you see them.
And about that peppermint extract—get the good stuff. I used the cheap grocery store brand once and it tasted like toothpaste. McCormick or Nielsen-Massey are worth it.
How to Make Meltaway Cookies (The Right Way)
Okay here’s the actual process and I promise it’s easier than it looks:
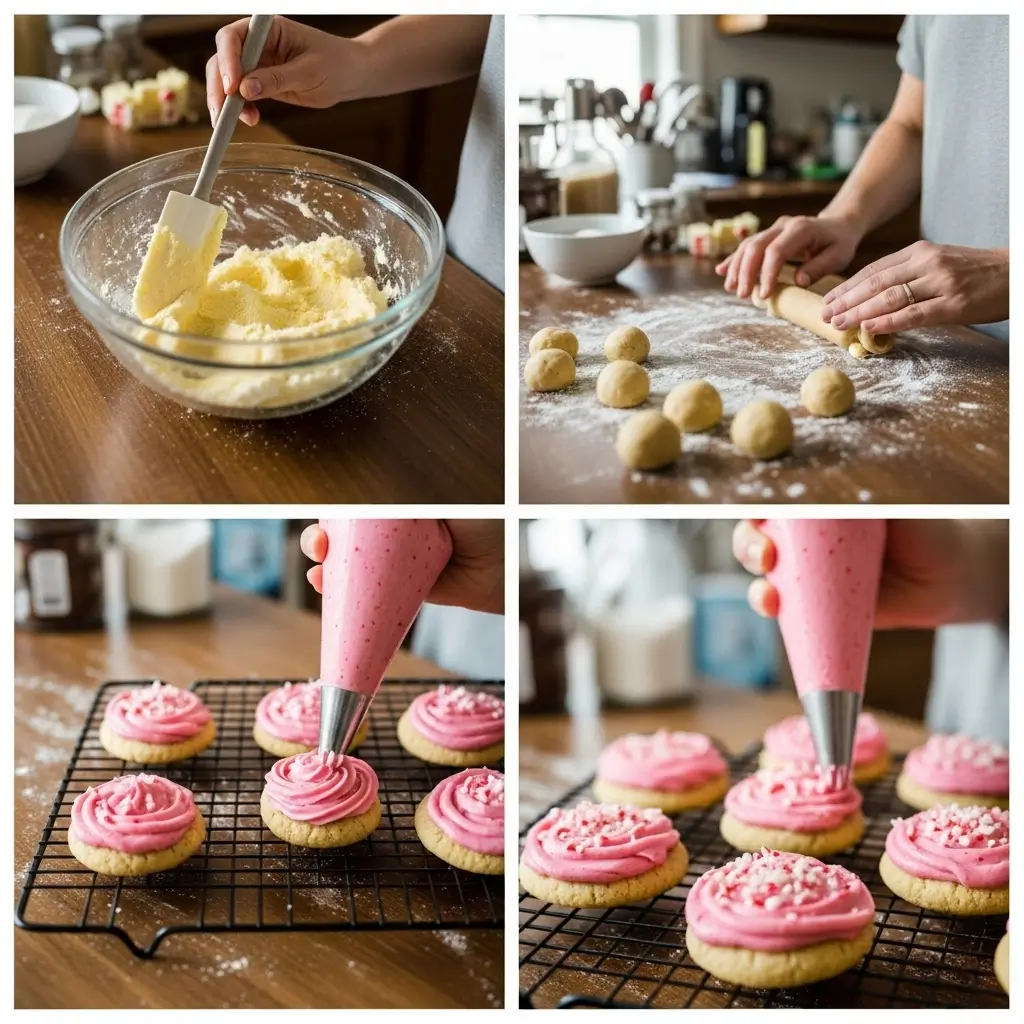
Step 1: In a large bowl with a hand mixer (or stand mixer if you’re fancy), beat the softened butter and powdered sugar together for like 2-3 minutes until it’s light and fluffy. This step matters. Don’t rush it.
Step 2: Add the egg yolk, vanilla extract, and peppermint extract. Beat until everything is smooth and creamy. It should look kind of like frosting at this point.
Step 3: In a separate bowl, whisk together the flour, cornstarch, baking powder, and salt. I used to skip this step and just dump everything in but mixing the dry ingredients first really does help.
Step 4: Add the dry ingredients to the wet ingredients and mix on LOW speed until just combined. Don’t overmix or your cookies will be tough. As soon as you don’t see white streaks anymore, stop mixing.
Step 5: Cover the bowl with plastic wrap and stick it in the fridge for at least 30 minutes. I usually do an hour because I’m paranoid. You can also leave it overnight if you want to bake them the next day.
Step 6: Preheat your oven to 350°F. Line your baking sheets with parchment paper. Do NOT skip the parchment paper. These cookies are delicate and will stick to bare pans.
Step 7: Scoop the dough into 1-tablespoon sized balls. I use a cookie scoop for this because trying to roll them with your hands when they’re this soft is annoying. Place them about 2 inches apart on the baking sheets.
Step 8: Flatten each ball slightly with your palm. They should be about 1/2 inch thick. They won’t spread much in the oven so whatever shape you make them is basically the shape they’ll be.
Step 9: Bake for 12-14 minutes. They’re done when the bottoms are BARELY golden. The tops won’t brown. If the tops are browning, you’ve overbaked them. They’ll still taste good but they won’t have that melt-away texture.
Step 10: Let them cool on the pan for 5 minutes, then transfer to a wire rack to cool completely. They’re super soft when they come out of the oven and will break if you try to move them too soon. Patience.
Step 11: Make the buttercream while the cookies cool. Beat the softened butter until fluffy, then gradually add the powdered sugar, milk, and peppermint extract. Beat for 2-3 minutes until it’s smooth and spreadable. Add a tiny drop of pink or red food coloring if you want that pretty pink color. And I mean TINY. Like toothpick-tiny. Too much and they’ll be red.
Step 12: Once the cookies are completely cool, frost them with the buttercream. I use a knife to spread it on but you could also pipe it on if you’re feeling fancy. Immediately sprinkle the crushed candy canes on top before the frosting sets.
Step 13: Let the frosting set for about 30 minutes before storing them.

My Meltaway Cookie Disasters (Learn From Me)
Attempt #1: Didn’t chill the dough because I was impatient. Cookie puddles. Total disaster.
Attempt #2: Used peppermint oil instead of extract because I thought they were the same thing. They’re not. The cookies tasted SO minty that eating one was like brushing your teeth. Gross.
Attempt #3: Overbaked them by 3 minutes because I was chatting on the phone and lost track of time. They were crunchy instead of melt-in-your-mouth. Still edible but not the same.
Attempt #4: Tried to frost them while they were still warm. The buttercream melted everywhere and it looked terrible. Cool them completely.
Attempt #5: Forgot to crush the candy canes small enough and they were basically shards of peppermint pain. Put the candy canes in a ziplock bag and smash them with a rolling pin until they’re small pieces.
Tips for Perfect Soft Peppermint Christmas Cookies
Room temperature butter is crucial. Not melted, not cold from the fridge. Room temp. If you forget to take it out early, cut it into small pieces and it’ll soften faster.
Don’t skip the cornstarch. I know it seems like a lot. It’s supposed to be a lot. That’s the magic ingredient.
These freeze beautifully. Make the cookies, frost them, let them set, then freeze them in a single layer. Once frozen, you can stack them with parchment paper between layers. They’ll keep for 3 months.
Make them mini. Use a smaller cookie scoop and make tiny 1-inch cookies. They’re perfect for holiday cookie exchange recipes because people can grab a few without feeling guilty.
Color variations. You don’t have to use pink frosting. Green looks cute too. Or leave it white for a more elegant look. Red and green together if you’re really festive.
Chocolate version. I’ve seen people add a little cocoa powder to the buttercream to make chocolate peppermint meltaways. Haven’t tried it yet but it’s on my list.
Why These Are the Best Holiday Cookies to Give as Gifts
These cookies look FANCY. Like bakery-level fancy. But they’re actually pretty easy once you get the hang of them. I package them in clear cellophane bags with ribbon and people think I’m some kind of baking genius.
Last year I gave them to my mail carrier, my kids’ teachers, and my hairdresser. Everyone loved them. My hairdresser asked if I’d make them for her daughter’s wedding. That’s how good they are.
They’re also sturdy enough for gifting. The cookies themselves are delicate, but once frosted and the buttercream sets, they hold up well in transit. Just don’t stack them directly on top of each other without parchment paper.
Just Try Them Already
Seriously, if you like peppermint and you like cookies that literally dissolve in your mouth like some kind of buttery magic, make these. They’re perfect for cookie exchanges, Christmas parties, or just making on a random Tuesday because you deserve something nice.
My kids request these every December now. My husband, who claims he doesn’t like peppermint, eats them. My teenage nephew who “doesn’t do desserts” had three.
Make them once and you’ll understand why they’re called meltaways. And why I almost ate an entire batch by myself that first time 😊
[Recipe_Card]