Okay, so here’s the thing… I’ve made these No-Bake Peanut Butter Cheesecake Balls about seventeen times now (yes, I counted), and they’re still the easiest dessert I’ve ever made. And trust me, I’ve burned plenty of things trying to impress people at potlucks.
Last month, my sister-in-law asked me to bring “something fancy” to her dinner party. I panicked. My oven was acting weird—you know that thing where it heats unevenly and burns everything on one side? Yeah, that. So I thought, what’s a no bake dessert recipe that doesn’t require me to trust my sketchy oven?
That’s when these peanut butter cheesecake balls saved my life. Or at least saved me from showing up empty-handed.
Table of Contents
Why I’m Obsessed with This Easy No Bake Dessert
Look, I’m gonna be honest with you. I’m not a professional baker. My Pinterest board is full of elaborate desserts I’ll never make, and my kitchen looks like a bomb went off after I cook. But these easy peanut butter dessert balls? They’re different.
First time I tried making them, I thought they’d be complicated. Cheesecake sounds fancy, right? But nope. The whole thing took me maybe 20 minutes of actual work, and most of that was just me trying to roll perfect balls (spoiler: they don’t need to be perfect, just roll them and move on with your life).
My neighbor Karen—who’s one of those people with a spotless kitchen and matching measuring cups—even asked me for the recipe. That felt GOOD.
What You’ll Need for These Peanut Butter Cheesecake Bites
The ingredient list is stupid simple. Like, embarrassingly simple. Here’s what you need for these cream cheese peanut butter balls:
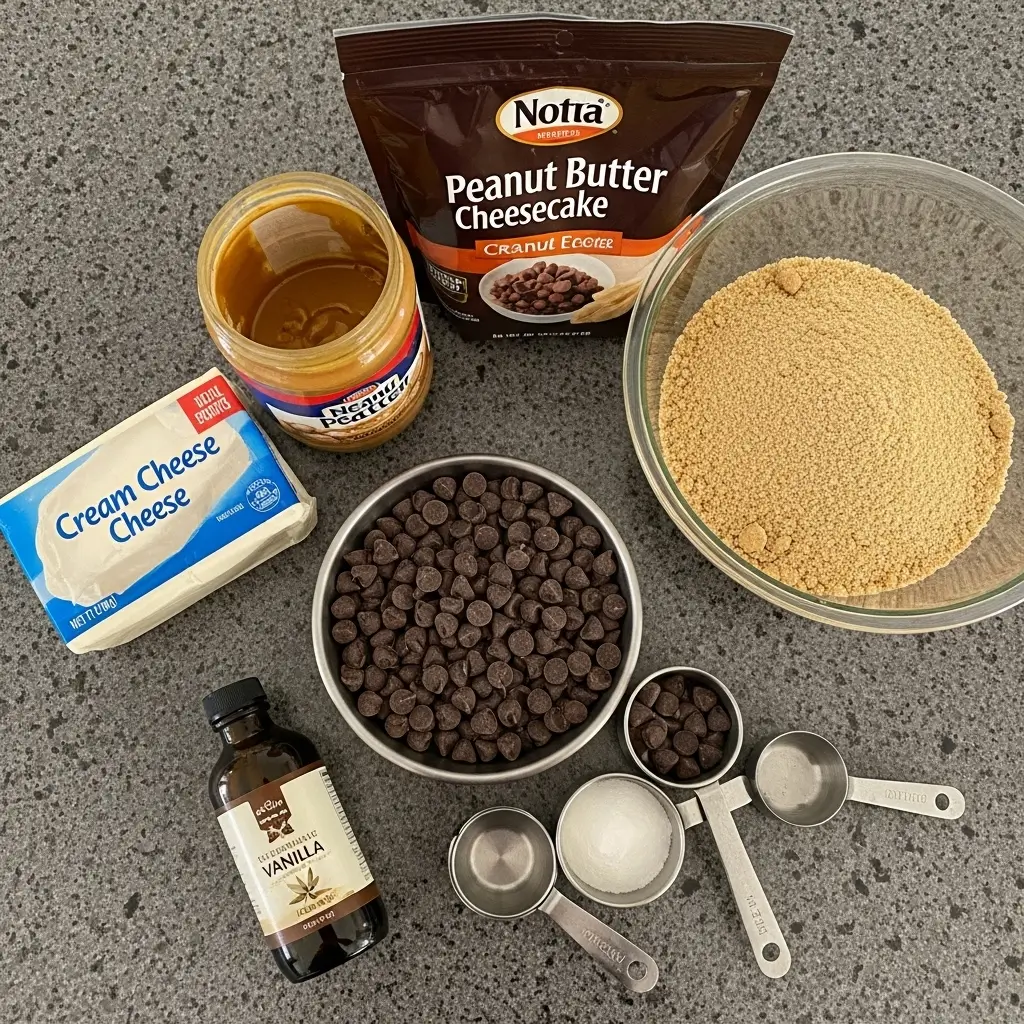
For the filling:
- 8 oz cream cheese (softened—don’t skip this part or you’ll be there forever trying to mix it)
- 1 cup creamy peanut butter (I use Jif because that’s what my mom always bought, but use whatever you like)
- 1 cup powdered sugar (sifted, unless you enjoy little sugar lumps in your dessert)
- 1 teaspoon vanilla extract
- 1½ cups graham cracker crumbs (I just buy the pre-crushed kind from the store because I don’t have time to smash crackers in a bag)
For the chocolate coating:
- 8 oz semi-sweet chocolate chips (or a chocolate bar if you’re feeling fancy)
- 2 tablespoons coconut oil (optional, but it makes the chocolate so much smoother)
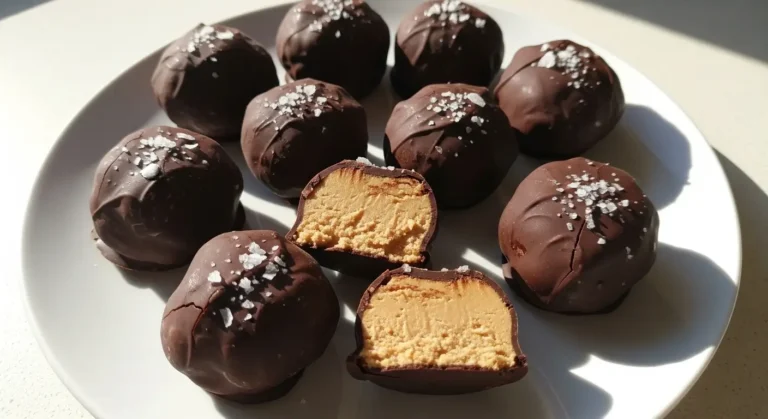
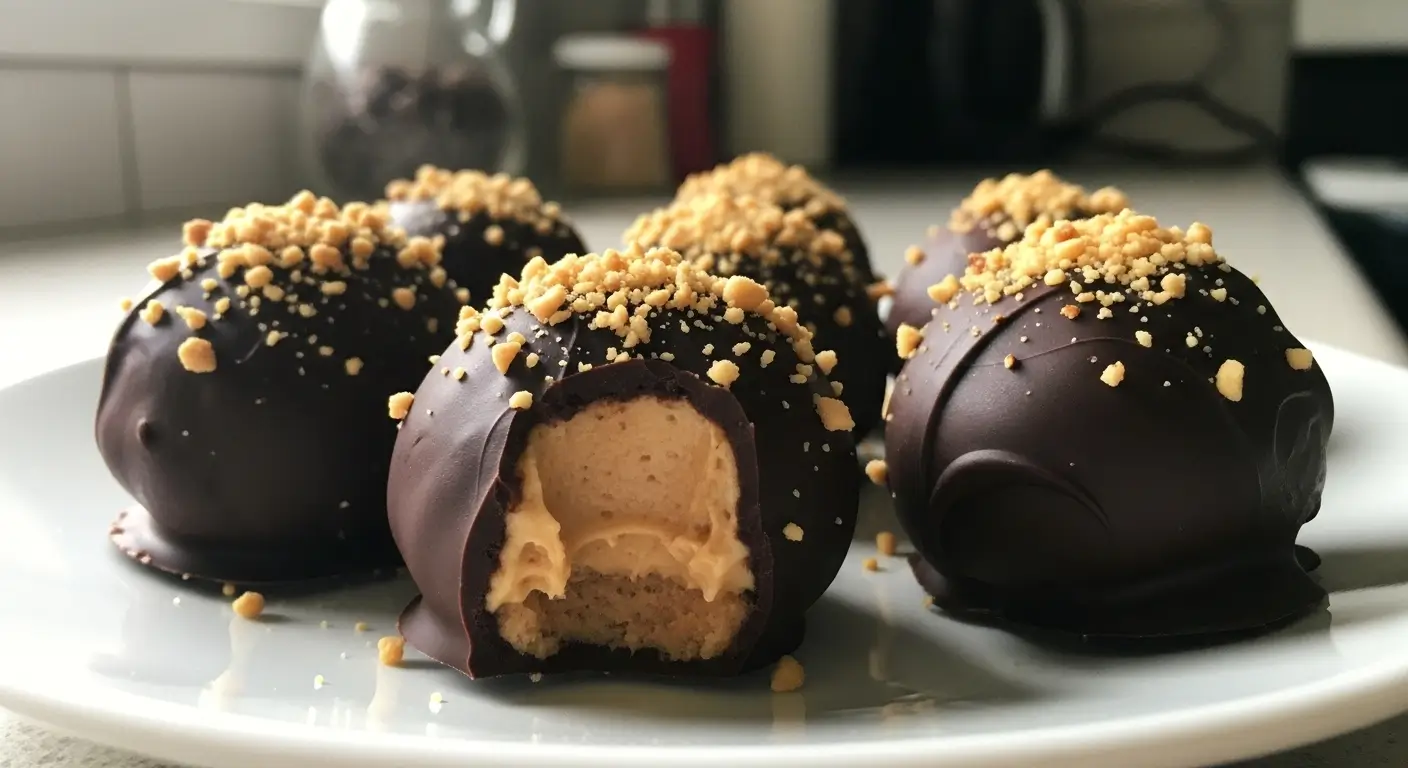
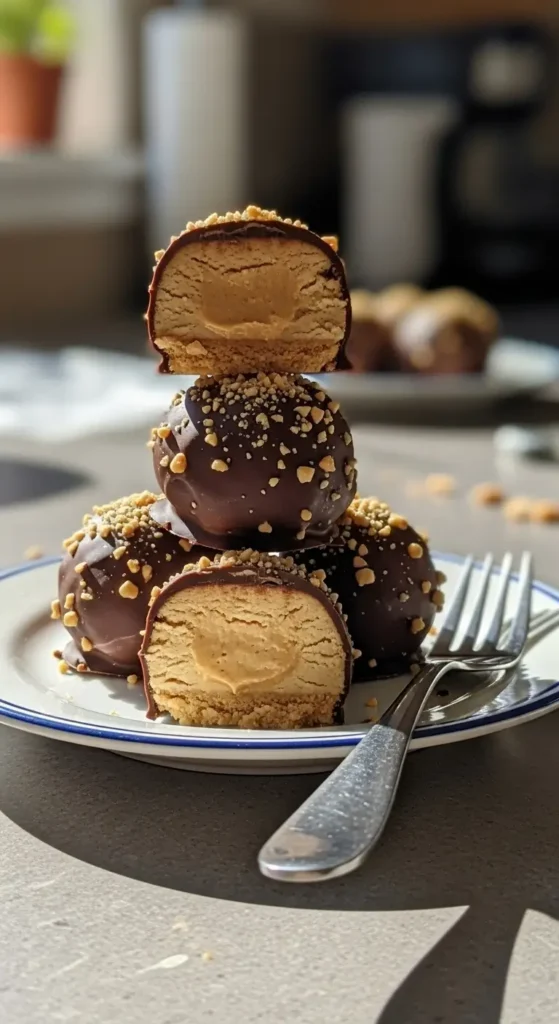
- Crushed peanuts or sprinkles for topping (also optional, but they make it look like you tried harder than you did)
Quick shopping tip: Don’t buy natural peanut butter for this. I tried it once thinking I’d be all health-conscious, and the mixture turned into an oily mess. Just use regular peanut butter cream cheese dessert grade stuff.
How to Make Peanut Butter Cheesecake Balls (The Real Way)
Alright, let me walk you through this like I’m texting my best friend. No fancy chef language here.
Step 1: Mix Everything Together
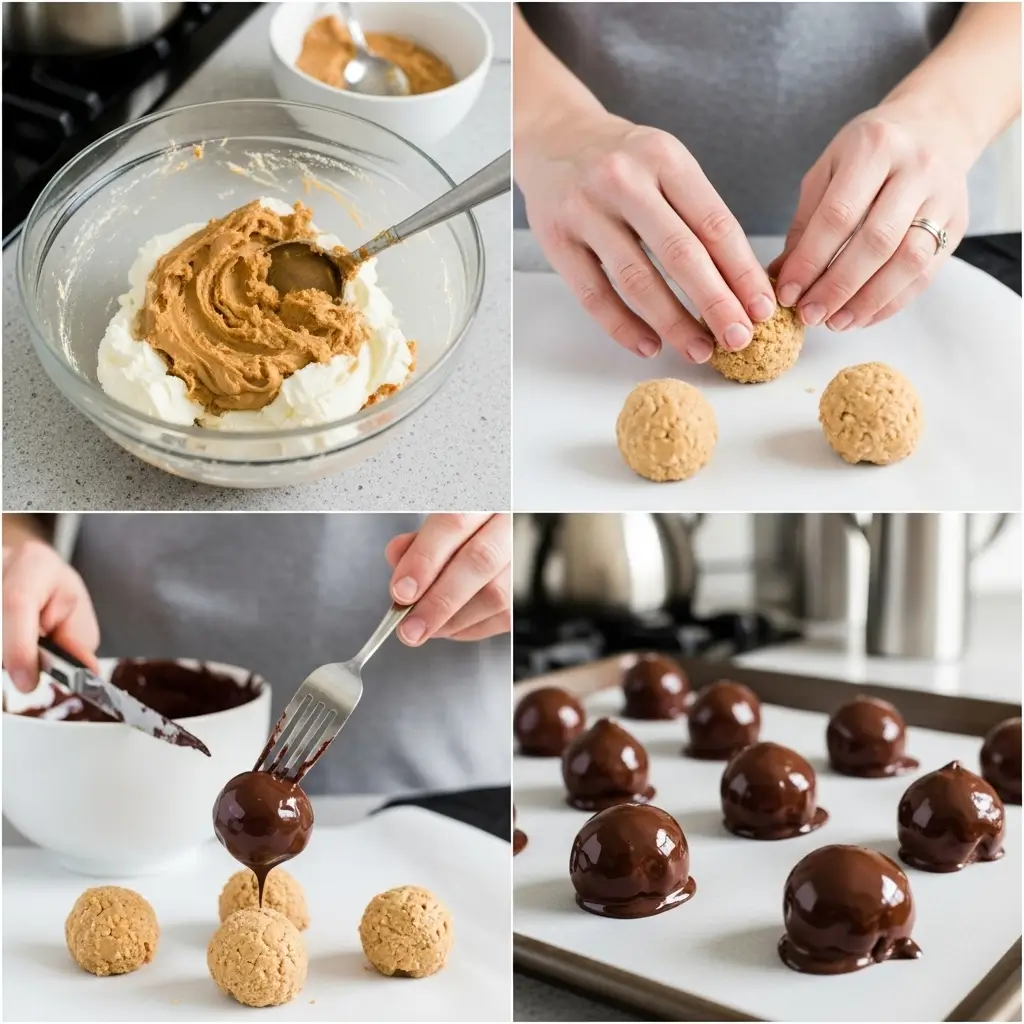
Take your softened cream cheese (seriously, let it sit out for like 30 minutes first) and throw it in a big bowl with the peanut butter, powdered sugar, and vanilla. Beat it with an electric mixer until it’s smooth and creamy.
Now here’s where I messed up the first time—I didn’t soften my cream cheese enough, and I ended up with these weird lumpy bits. Learn from my mistakes, people.
Once it’s all mixed, fold in those graham cracker crumbs. The mixture should look kinda thick and doughy. If it’s too sticky to handle, pop it in the fridge for like 15 minutes. (I usually use this time to scroll through my phone and pretend I’m not procrastinating.)
Step 2: Roll Into Balls
This is the fun part. Or the annoying part, depending on how you feel about getting your hands dirty.
Use a small cookie scoop (about 1 tablespoon) or just grab chunks with a spoon and roll them between your palms into 1-inch balls. They don’t have to be perfect spheres—mine never are. Place them on a baking sheet lined with parchment paper.
Pro tip I learned the hard way: Grease your hands lightly with cooking spray. Otherwise, the mixture sticks to your palms and you’ll be standing there like “why is this so hard?” Trust me on this one.
Step 3: Chill Out (Literally)
Stick the baking sheet in the fridge for at least 30 minutes. This is important because if you try to dip warm balls into chocolate, they’ll just… dissolve. It’s not pretty. I know because I got impatient once and tried anyway.
Go watch an episode of something on Netflix while you wait. That’s what I do.
Step 4: The Chocolate Coating
While your no bake peanut butter balls are chilling, melt your chocolate. I do this in the microwave in a bowl—30-second bursts, stirring between each one. Add the coconut oil if you’re using it. This makes the chocolate thinner and easier to work with.
Once everything’s melted and smooth, take your chilled balls out of the fridge. Work with 4-5 at a time so the rest stay cold.
Use a fork or a toothpick (I use a fork because I can never find toothpicks when I need them) to dip each ball into the melted chocolate. Let the excess drip off, then place them back on the parchment paper.
If you’re adding toppings like crushed peanuts or sprinkles, do it NOW before the chocolate hardens. I forgot this once and ended up with sprinkles just sitting on top of hard chocolate looking all sad and not stuck down.
Step 5: Final Chill
Pop them back in the fridge for another 15-20 minutes to let that chocolate set properly.
And that’s it! You just made homemade peanut butter cheesecake balls that taste like they came from some expensive dessert shop.
My Tips for Making These Even Better
After making these a million times, I’ve learned some things:
Don’t skip the chilling steps. I know it’s tempting when you want to eat them RIGHT NOW, but patience pays off here. Room temperature cheesecake balls covered in chocolate are just… messy.
Double the batch. These disappear so fast. My husband ate six in one sitting the first time I made them. Now I always make extra and hide some in the back of the fridge behind the vegetables where he never looks.
Try different toppings. I’ve done crushed Oreos, mini chocolate chips, shredded coconut, even a tiny sprinkle of sea salt. All good. Get creative with your peanut butter dessert balls recipe.
Make ahead for parties. These are perfect make ahead dessert balls. I usually make them the night before and just pull them out when guests arrive. They look impressive but required like zero effort.
Oh, and one more thing—if your chocolate coating is too thick, just add a bit more coconut oil. If you don’t have coconut oil, a tiny bit of vegetable oil works too. Don’t tell the food snobs I said that.
When I Serve These
I’ve brought these no bake holiday desserts to basically every event now:
My nephew’s birthday party (he’s 5 and called them “candy balls”)
Thanksgiving (they disappeared before the pie)
Random Tuesday when I needed something sweet
Book club (where I pretended I read the book but really just brought good snacks)
They’re also great for those moments when you’re stress-eating at 10 PM and need something that feels fancy but is sitting right there in your fridge. Not that I’ve done that. Multiple times.
The Chocolate Peanut Butter Variation
Want to make chocolate peanut butter cheesecake balls? Add 3 tablespoons of cocoa powder to the filling mixture. I did this once for my daughter’s bake sale, and they sold out in like 10 minutes.
You can also use white chocolate for the coating if you’re feeling fancy. Or do half in dark chocolate and half in white chocolate. They look super impressive on a plate, and people will think you spent way more time than you actually did.
Final Thoughts on This Quick Peanut Butter Dessert
So yeah, that’s my no bake peanut butter dessert recipe. It’s nothing complicated, nothing fancy, just really good. The kind of recipe you’ll actually make again because it doesn’t require you to be a professional baker or own special equipment.
My only warning: don’t make these when you’re home alone unless you have serious self-control. I ate seven in one night once and regretted nothing. Okay, I regretted it a little the next morning, but they were worth it.
Give these a try and let me know how they turn out! Did you add any fun toppings? Did you burn the chocolate like I did the first time? (Seriously, watch that microwave.) Drop a comment because I love hearing about other people’s kitchen adventures and disasters.
Happy snacking! And remember—if the balls aren’t perfectly round, just call them “rustic” and people will think you did it on purpose. 😉