Jelly Cat Birthday Cake That Actually Looks Like a Jellycat (Almost)
Okay, so I messed this up twice before getting it right, and honestly? My daughter’s third attempt at describing what she wanted for her birthday cake nearly broke my brain. “I want a Jellycat cake, Mommy, but it has to be EXACTLY like Bashful Bunny but also taste like strawberries and have sprinkles but not too many sprinkles because that’s yucky.”
Right. No pressure there.
This whole jelly cat birthday cake adventure started because apparently buying a $40 sheet cake from the grocery store with a random bunny on it wasn’t going to cut it for my very particular six-year-old. She wanted her beloved Jellycat stuffed animal turned into cake form, and after seeing some Pinterest disasters… I mean, inspiration… I figured how hard could it be?
Spoiler alert: it was harder than I thought, but not impossible.
Table of Contents
How I Became a Jelly Cat Birthday Cake Expert (By Accident)
Look, I’m gonna be honest with you—I had never even heard of Jellycat stuffed animals until my daughter became obsessed with them. For those of you who don’t know, they’re these ridiculously soft, adorable plush toys that cost way too much money but somehow justify their price tag by being absolutely perfect.
My daughter has this bunny called Bashful Bunny that goes everywhere with her. Seriously, this thing has been to more restaurants than most food critics. So when she announced that her birthday cake HAD to look like Bashful Bunny, I knew I was in for it.
First attempt was… well, let’s call it abstract art. I tried to carve a regular round cake into a bunny shape and it looked like something that survived a natural disaster. My husband came into the kitchen, looked at it, and very carefully asked, “Is that… supposed to be an animal?”
Second attempt, I got smart and tried to use a bunny-shaped pan I found on Amazon. Better shape, but the proportions were all wrong and it looked more like a demented Easter decoration than a cute Jellycat.
But third time’s the charm, right? That’s when I figured out the secret: you don’t try to make the cake look exactly like a Jellycat. You make it INSPIRED by a Jellycat.
The Secret to a Perfect Jelly Cat Birthday Cake
Here’s what I learned after multiple Pinterest fails and one very patient daughter who kept saying, “It’s okay Mommy, it still looks like Bashful” while clearly disappointed: the magic isn’t in getting every detail perfect. It’s in capturing the essence of what makes Jellycats so lovable—that soft, squishy, huggable quality.
For my jelly cat birthday cake, I focused on three things: the right colors, the right texture (super soft cake), and those distinctive long floppy ears that make Jellycat bunnies so recognizable.
The cake itself needed to be incredibly moist and tender—like, so soft it almost falls apart when you touch it. That mimics that squishy Jellycat feeling. And the frosting had to be smooth and perfectly colored to match that signature Jellycat beige/cream color.
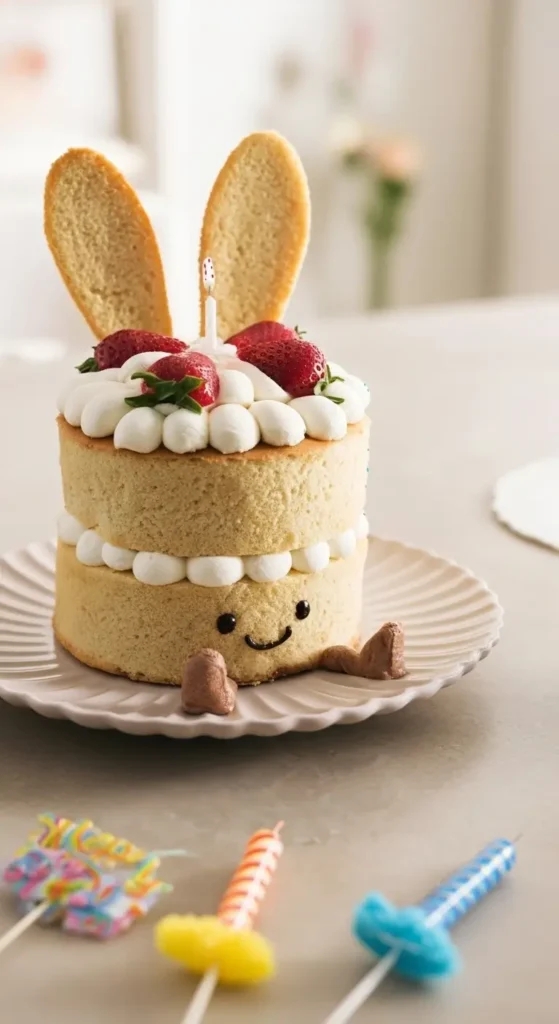
The ears were the trickiest part. I tried making them out of cake first, but they kept breaking off. Then I discovered modeling chocolate, and everything changed.
Why This Jelly Cat Birthday Cake Actually Works
This recipe works because it’s forgiving. Kids don’t care if the ears are slightly lopsided or if the frosting isn’t perfectly smooth. They care that it looks like their beloved stuffed animal and tastes amazing.
The cake base is basically a super tender vanilla cake that’s almost impossible to mess up. Even if you overcook it slightly (been there), it’s still soft enough to work with. The buttercream is stable enough to hold its shape but soft enough to look natural.
And here’s the best part—you can adapt this jelly cat birthday cake to any Jellycat animal. Want to make a lamb instead of a bunny? Just change the ear shape. Want a different color? Adjust the food coloring. My neighbor made one for her son’s elephant obsession and it was adorable.
Ingredients for Your Jelly Cat Birthday Cake Adventure
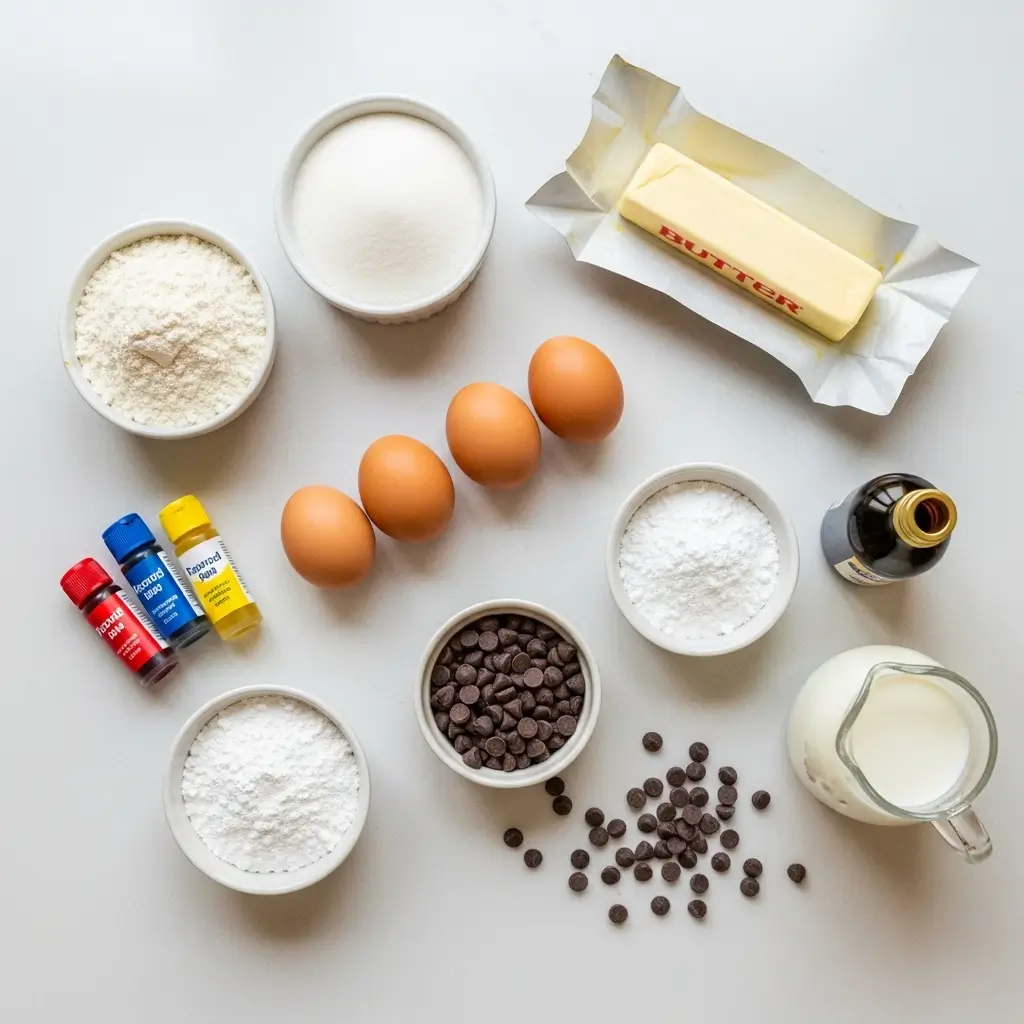
Alright, let’s talk ingredients. Don’t try to get fancy with this—simple ingredients make the best cake, and kids don’t care about organic this or artisanal that.
For the Cake:
- 2 1/2 cups all-purpose flour (I use Gold Medal because it’s reliable)
- 2 1/2 teaspoons baking powder
- 1/2 teaspoon salt
- 1 3/4 cups granulated sugar
- 1/2 cup unsalted butter, softened
- 1/2 cup vegetable oil (this keeps it super moist)
- 4 large eggs, room temperature
- 2 teaspoons vanilla extract
- 1 1/4 cups whole milk
For the Buttercream:
- 1 cup unsalted butter, softened
- 4-5 cups powdered sugar (start with 4, add more if needed)
- 1/4 cup heavy cream
- 2 teaspoons vanilla extract
- Gel food coloring (tan/beige for bunny color)
- Pinch of salt
For the Ears (Modeling Chocolate):
- 6 oz white chocolate, chopped
- 1/3 cup light corn syrup
- Food coloring to match
For Decorating:
- Black candy melts or chocolate chips (for eyes and nose)
- Pink candy melts (for inner ears, optional)
About that oil in the cake—don’t skip it. I know some people are weird about oil in cake, but it’s what makes this jelly cat birthday cake so incredibly moist. The combination of butter and oil gives you the best of both worlds: flavor from the butter, moisture from the oil.
And please, use gel food coloring, not the liquid stuff. Liquid food coloring can mess with your frosting consistency and you’ll never get that perfect Jellycat color with the cheap grocery store drops.
How to Make Your Jelly Cat Birthday Cake
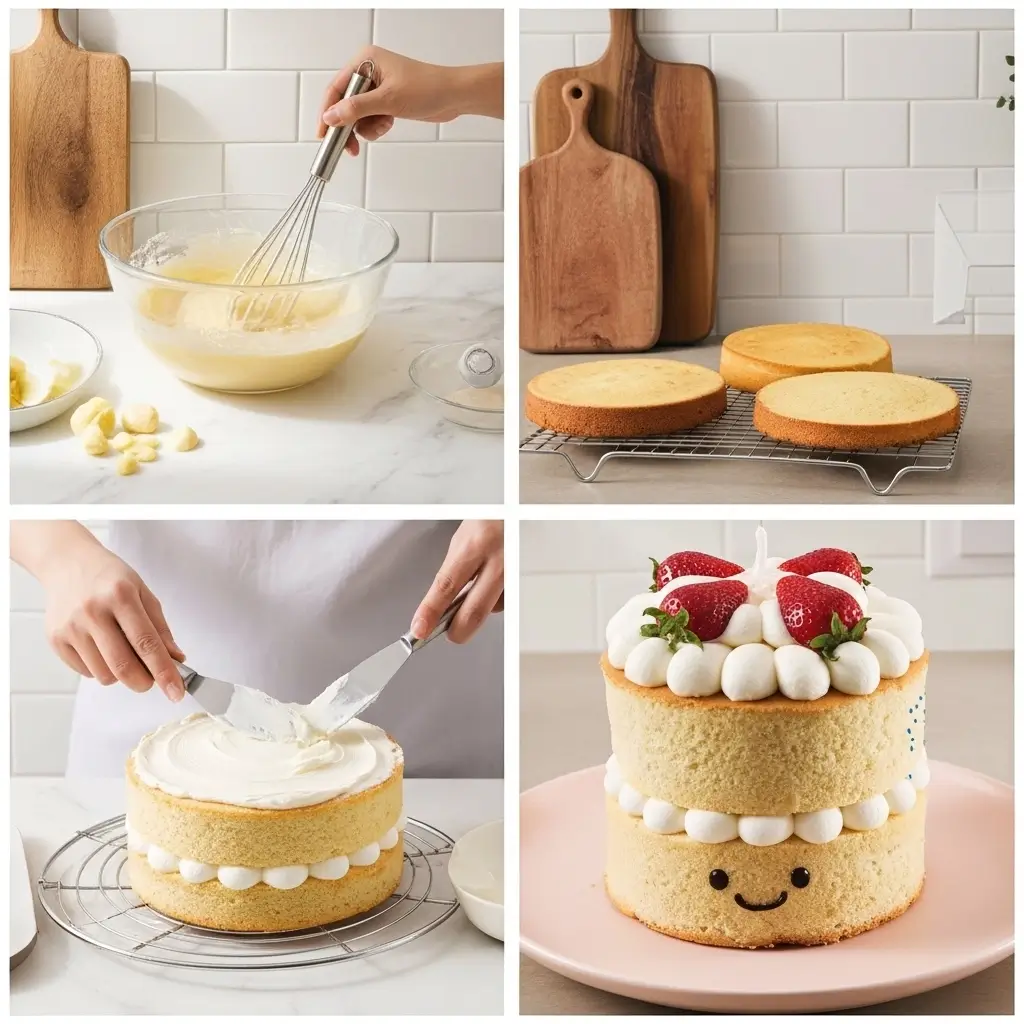
Step 1: Bake the Perfect Base
Preheat your oven to 350°F and grease two 8-inch round pans. In a medium bowl, whisk together flour, baking powder, and salt.
In a large bowl, cream the butter and sugar until light and fluffy (about 3-4 minutes). Add the oil and mix well. Beat in eggs one at a time, then vanilla.
Alternate adding the dry ingredients and milk, beginning and ending with the flour mixture. Mix until just combined—don’t overbeat or you’ll get a tough cake.
Divide batter between pans and bake for 25-30 minutes until a toothpick comes out clean. Cool completely before frosting. And I mean completely—warm cake will melt your buttercream and you’ll be sad.
Step 2: Make the Modeling Chocolate Ears
This part is easier than it sounds, I promise. Melt the chocolate in 30-second intervals in the microwave, stirring between each. Let it cool slightly, then stir in the corn syrup until it forms a dough.
Wrap in plastic wrap and let it sit for at least 2 hours. Then you can roll it out and cut ear shapes. I made a paper template first—two long oval shapes for the outer ears and two smaller ones for the inner ears if you want that detail.
Step 3: Make the Buttercream
Beat the butter until light and fluffy. Gradually add powdered sugar, beating well after each addition. Add cream, vanilla, and salt. Beat until smooth and pipeable.
Add gel food coloring a tiny bit at a time until you get that perfect Jellycat beige color. It should look like coffee with too much cream in it.
Step 4: Assemble Your Jelly Cat Birthday Cake
Level your cakes if needed (I use a long serrated knife and try not to make it too wonky). Place one layer on your serving plate and spread frosting on top. Add the second layer.
Apply a thin crumb coat all over and refrigerate for 30 minutes. This step is crucial—don’t skip it or you’ll have crumbs in your final frosting layer.
Apply the final layer of frosting, smoothing it as best you can. It doesn’t have to be perfect—Jellycats aren’t perfectly smooth either.
Step 5: Add the Details
Insert the modeling chocolate ears into the top of the cake. Use a knife to make small slits and gently press them in. Add the chocolate chip eyes and nose, pressing them gently into the frosting.
Stand back and admire your creation. Your kid is going to lose their mind with excitement.
My Personal Tips for Jelly Cat Birthday Cake Success
Room Temperature Everything: Make sure your eggs, milk, and butter are all room temperature before you start. This makes mixing so much easier and gives you a better texture.
Don’t Rush the Cooling: I know you want to frost that cake right away, but patience is key. Hot cake equals melted frosting equals disaster.
Practice the Color: Make a small batch of frosting first to practice getting the color right. Jellycat colors are very specific, and it’s easy to go too dark or too pink.
Embrace Imperfection: Kids don’t care if it’s Instagram-perfect. They care that you made their dream cake. My daughter still talks about her “Bashful cake” even though one ear was definitely wonky.
Actually, you know what? That wonky ear became part of the charm. She said it made it look “more real like Bashful” because her stuffed bunny’s ears aren’t perfectly symmetrical either.
Variations on the Jelly Cat Birthday Cake Theme
Different Animals: Change the ear shape for different Jellycats. Elephant ears are actually easier because they’re bigger and more forgiving.
Different Flavors: Swap vanilla for strawberry or lemon. Just adjust the liquid ratios if you add fruit puree.
Size Changes: This recipe works for a single 9×13 sheet cake too if you want to skip the round cake drama.
Simpler Version: Can’t be bothered with modeling chocolate? Use ice cream cones for ears. Not as elegant, but kids think it’s hilarious.
The Disaster: I once tried to make whiskers using black icing and a piping bag. It looked like the bunny had a mustache. Some things are better left simple.
Why This Beats Store-Bought Character Cakes
Store-bought character cakes are expensive and usually taste like sweet cardboard. This jelly cat birthday cake actually tastes good—like, adults-will-eat-it good, not just kids-will-tolerate-it good.
Plus, there’s something special about making your kid’s birthday cake yourself. The imperfections become part of the story. My daughter still brings up details about “the time Mommy made Bashful into a cake” whenever we talk about birthdays.
And let’s be real about the cost—this whole cake probably costs $12 in ingredients versus $40+ for a custom bakery cake that might not even look right.
The Real Talk About Making a Jelly Cat Birthday Cake
This isn’t a quick project. Between baking, cooling, making frosting, and decorating, you’re looking at most of a day. But most of that is hands-off waiting time.
Also, your kitchen will be a disaster. I’m talking flour everywhere, powdered sugar on surfaces you didn’t even know existed, and somehow chocolate fingerprints on the ceiling. Plan accordingly.
And one more thing—take pictures of the process. I wish I had more photos of my daughter “helping” me make her cake because those memories are almost as sweet as her face when she saw the finished product.
The first time I made this jelly cat birthday cake, I was so stressed about getting it perfect. But watching my daughter’s face light up when she saw it made every wonky detail worth it. She didn’t see the imperfections—she saw her beloved Bashful Bunny transformed into something she could share with everyone at her party.
Now it’s become our tradition. Every year, she picks a different Jellycat and we figure out how to turn it into cake form. Last year was a lamb (easier than the bunny, honestly), and this year she’s already planning a cat version.
If you’re thinking about making a jelly cat birthday cake for your little one, just go for it. It doesn’t have to be perfect—it just has to be made with love. And maybe have a backup grocery store cake hidden in the freezer, just in case. Not that I’ve ever done that or anything.
Let me know how yours turns out! I’m always curious to see other people’s Jellycat creations, and if you figure out an easier way to make those ears, please share your secrets