Fried Strawberry Cheesecake Sandwiches: The State Fair Treat I Learned to Make at Home
Fried Strawberry Cheesecake Sandwiches became my mission after I paid $12 for one at the state fair and immediately regretted not buying three more. I came home, still thinking about that crispy, creamy, strawberry-filled perfection, and decided I HAD to figure out how to make them myself.
Seven attempts later (one caught on fire—we don’t talk about that), I finally nailed these strawberry cheesecake sandwiches. And honestly? Mine might be better than the fair version. Don’t tell the carnival people I said that.
Table of Contents
How These Fried Cheesecake Sandwich Dreams Happened
Look, I’m gonna be honest—I had no idea what I was doing when I started. I’d never deep fried anything that wasn’t frozen chicken nuggets from the store. But I was determined, and slightly obsessed, which is basically the same as having a plan, right?
First attempt was with regular sandwich bread. It turned into a soggy, greasy mess that fell apart the second I tried to flip it. My husband walked into the kitchen, saw the disaster, and just said “interesting choice” which is code for “what are you doing?”
Version two, I used Texas toast thinking thicker bread would help. It did help—help create bread that was burnt on the outside and raw on the inside. I didn’t even know that was possible until I cut into it and found basically uncooked dough in the middle.
By attempt three, I’d figured out I needed to freeze the assembled sandwiches first (game changer), use the right oil temperature (also crucial), and not panic when they hit the oil (still working on that last part).
Why This Deep Fried Strawberry Cheesecake Recipe Works
Here’s the thing about most fried strawberry desserts recipes online—they’re either way too complicated (who has time to make dough from scratch?), or they don’t tell you the crucial details like oil temperature and why freezing matters.
These crispy cheesecake sandwiches work because we’re keeping it simple. Store-bought bread, cream cheese filling that doesn’t leak, and a technique that actually makes sense for normal people who don’t have professional deep fryers.
Plus, they’re ready in like 30 minutes total if you don’t count the freezing time, which I usually forget about because I start assembling them and then remember “oh right, they need to freeze” and end up waiting around staring at my freezer like that’ll make time go faster.
The Ingredients for These Cheesecake Stuffed Sandwiches (Shopping Was An Adventure)
Alright, here’s what you need for these indulgent strawberry cheesecake fried desserts. I’ve learned what works through expensive and sometimes dangerous trial and error.
For the Filling:
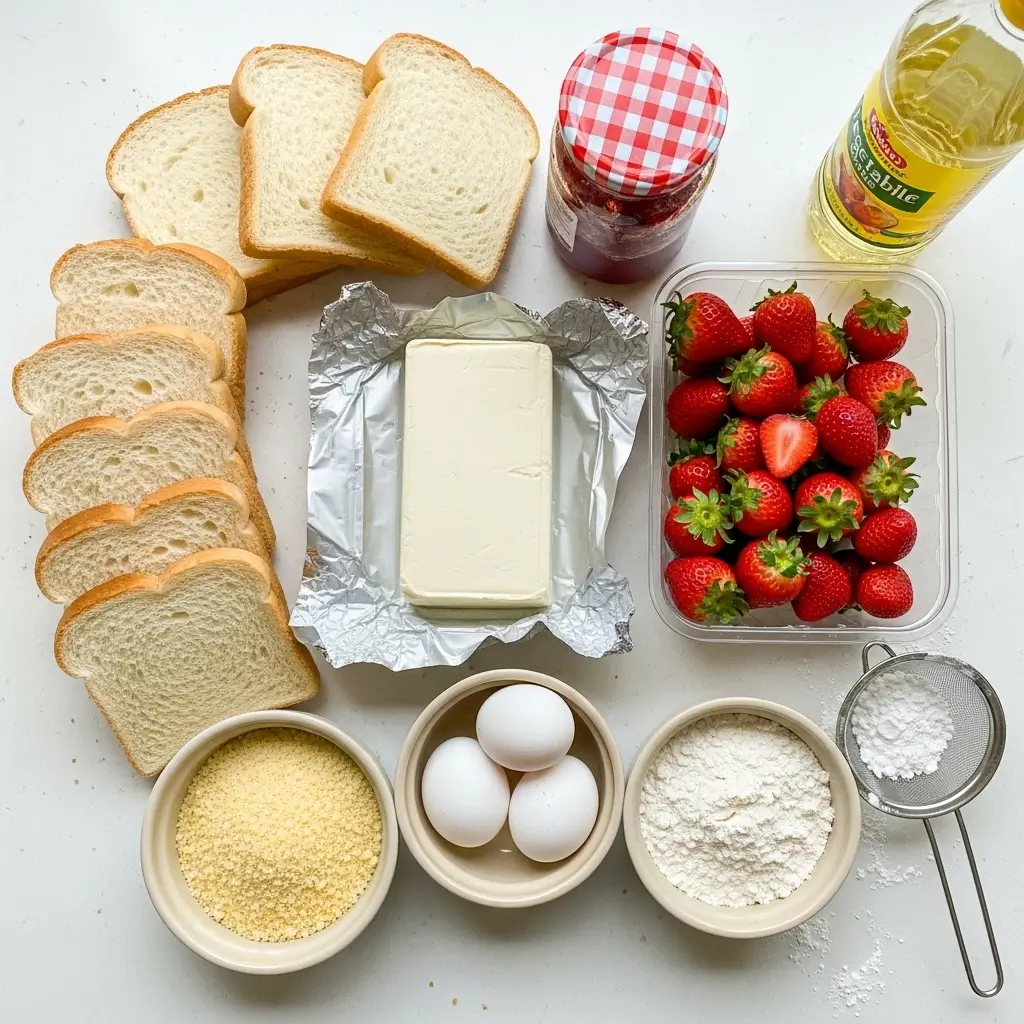
- 8 oz cream cheese, softened (one block—don’t use the spreadable kind)
- 1/4 cup powdered sugar
- 1 teaspoon vanilla extract
- 1 cup fresh strawberries, diced small (or use strawberry jam if you’re lazy)
- 2 tablespoons strawberry jam (even if you’re using fresh berries)
For the Sandwiches:
- 8 slices white bread (I use regular sandwich bread, not fancy stuff)
- 2 cups vegetable oil for frying (maybe more depending on your pan)
For the Coating:
- 2 eggs, beaten
- 1/4 cup milk
- 1 cup all-purpose flour
- 1 cup panko breadcrumbs (these make it extra crispy)
- 2 tablespoons granulated sugar
For Serving:
- Powdered sugar for dusting
- Extra strawberries
- Whipped cream if you’re feeling extra
Critical note: The cream cheese MUST be softened. I tried making this with cold cream cheese once and it was like trying to spread cement. Leave it out for an hour before you start.
Also about the bread—I tried using fancy artisan bread once because I thought it would be “better.” It wasn’t. Regular white sandwich bread is actually perfect for this because it’s soft enough to seal but sturdy enough to hold together.
How to Make These Easy Strawberry Cheesecake Dessert Sandwiches
Step 1: Make the Filling Beat softened cream cheese, powdered sugar, and vanilla until smooth and fluffy. Fold in your diced strawberries and the strawberry jam. The jam helps keep everything together and adds extra strawberry flavor.
Taste it. You’re gonna want to eat it all right now with a spoon. Resist. (I never resist, which is why I always make extra.)
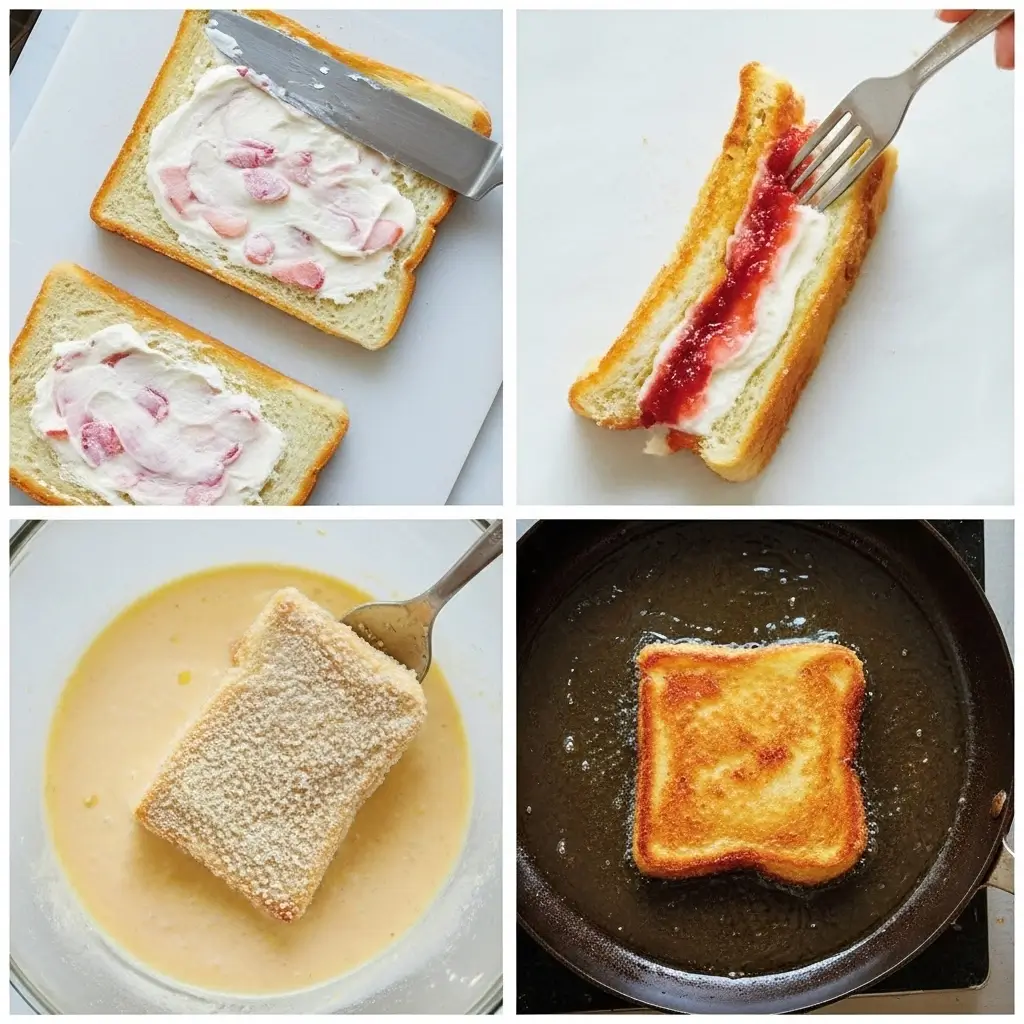
Step 2: Assemble the Sandwiches Lay out 4 slices of bread. Spread a thick layer of the cream cheese mixture on each slice, going almost to the edges but not quite—leave like a 1/4 inch border.
Top with the remaining bread slices and press down firmly around the edges to seal. Use a fork to crimp the edges like you’re making a pie crust. This is IMPORTANT. If you don’t seal them well, the filling will leak out when you fry them. (learned this the expensive, messy way)
Step 3: Freeze Those Bad Boys Place the assembled sandwiches on a baking sheet and freeze for at least 30 minutes. An hour is better. This step is crucial—frozen sandwiches hold together way better when you fry them.
I usually make them in the morning and leave them in the freezer until after dinner when I’m ready to fry them.
Step 4: Set Up Your Breading Station While they’re freezing, set up three shallow dishes:
- Flour in the first dish
- Beaten eggs mixed with milk in the second
- Panko breadcrumbs mixed with sugar in the third
Line them up in order because you’ll be moving fast once you start.
Step 5: Heat Your Oil Pour about 1-2 inches of oil into a large, heavy-bottomed skillet. Heat over medium-high until it reaches 350°F. Use a thermometer—this is not the time to guess.
If you don’t have a thermometer, drop a small piece of bread in. If it sizzles immediately and turns golden in about 60 seconds, you’re good.
Step 6: Bread the Sandwiches Take one frozen sandwich at a time. Dredge in flour, coating both sides. Dip in egg mixture, letting excess drip off. Finally, press into the panko breadcrumbs, making sure it’s fully coated on all sides.
Work quickly so the sandwiches don’t thaw too much.
Step 7: Fry Time Carefully place 1-2 sandwiches in the hot oil. Don’t crowd them or the temperature will drop. Fry for about 2-3 minutes per side until golden brown and crispy.
Use tongs or a slotted spoon to flip them. They’ll sizzle and bubble and look amazing. Try not to panic even though you’re literally playing with fire (or oil, which is basically the same thing).
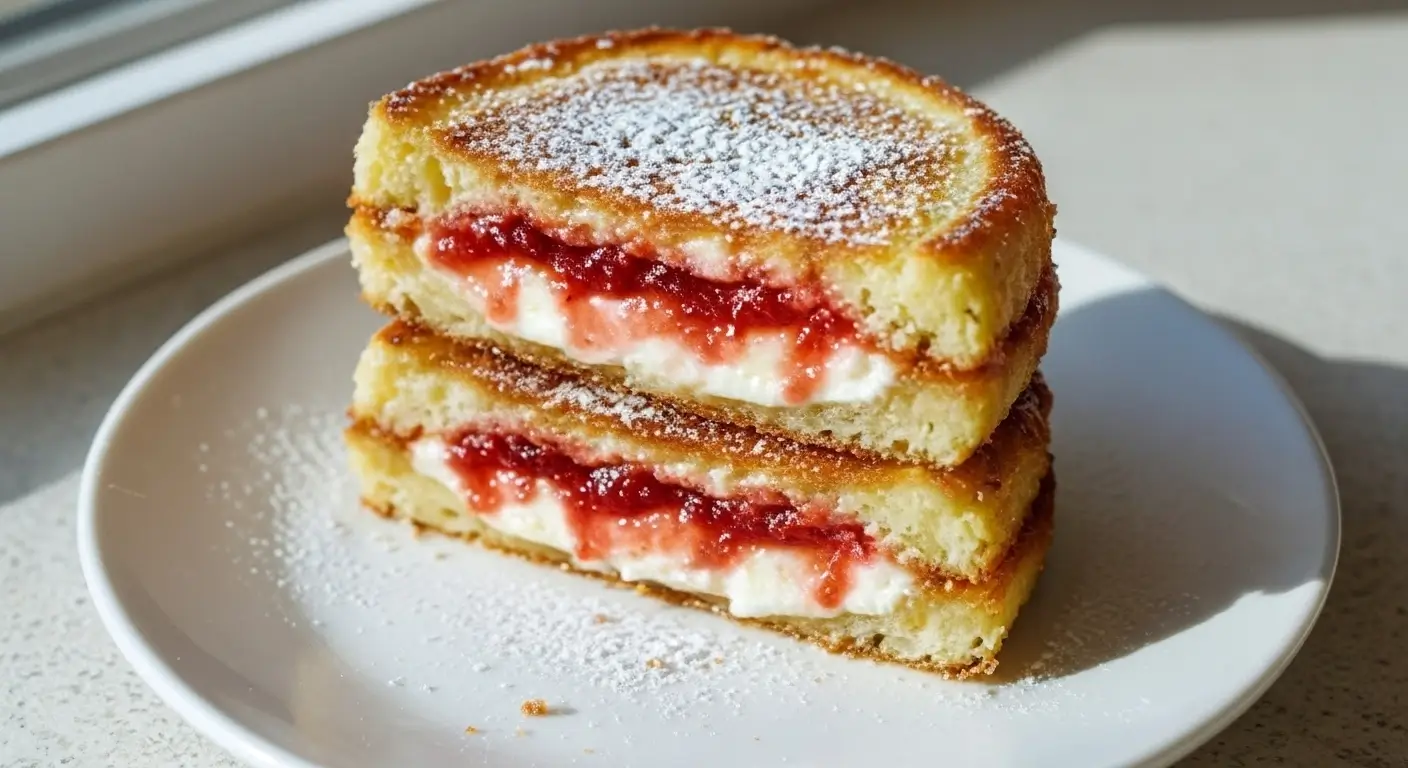
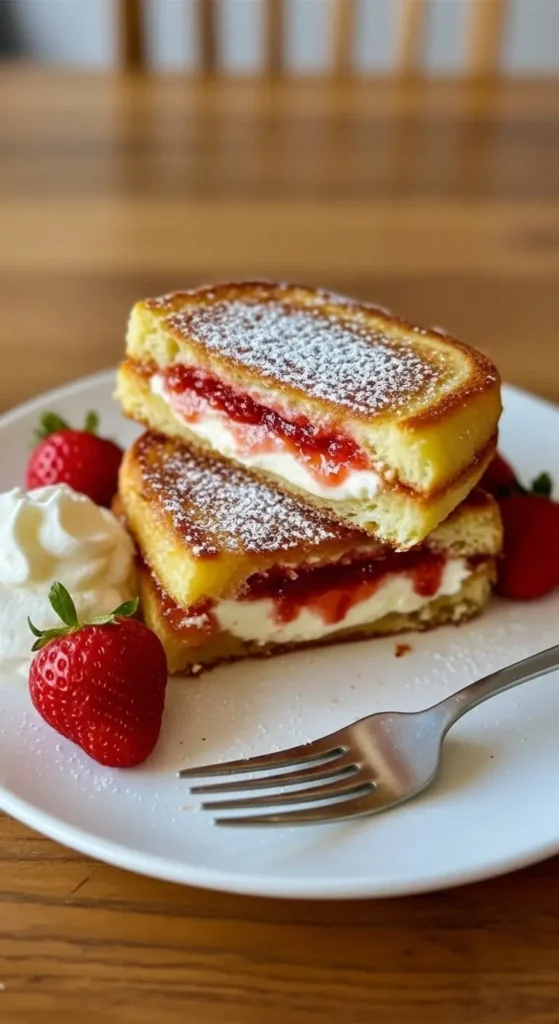
Step 8: Drain and Serve Transfer fried sandwiches to a paper towel-lined plate to drain excess oil. Let them cool for like 2 minutes—the filling is basically molten lava straight out of the fryer.
Dust with powdered sugar, top with fresh strawberries and whipped cream if you want, and serve immediately while they’re still warm and crispy.
Real Talk About These Crispy Fried Strawberry Cheesecake Sandwiches
Oil temperature is everything: Too hot and the outside burns before the inside warms up. Too cold and they absorb oil and get greasy. 350°F is the sweet spot.
The freezing step is not optional: I tried skipping it once because I was impatient. The sandwiches fell apart in the oil and I had to fish out cream cheese chunks with a slotted spoon. Just freeze them.
Fresh vs. jam strawberries: I’ve done both. Fresh strawberries taste better but are more watery. If you use fresh, definitely add that jam to help bind everything.
Safety stuff: Hot oil is dangerous. Don’t leave it unattended, don’t let kids or pets near it, and have a lid nearby in case something goes wrong. Never use water on an oil fire.
Reheating: These are best fresh, but you can reheat them in a 350°F oven for about 10 minutes. They won’t be quite as crispy but they’re still good.
Making This Best Fried Cheesecake Sandwich Recipe for a Crowd
First time I made these for friends, everyone went silent after the first bite. Not gonna lie, I thought I’d done something wrong until someone said “holy crap, these are amazing” with their mouth still full.
They’re the kind of dessert that makes people ask you to cater their parties, which is flattering until you realize you’d have to make like 50 of these and your kitchen only fits two in the pan at a time.
My sister requested these for her birthday instead of cake. INSTEAD OF CAKE. That’s when I knew I’d created something dangerous.
When Your Strawberry Cheesecake Bites Go Wrong
Filling is leaking out: You didn’t seal the edges well enough or you didn’t freeze them long enough. Make sure to really press and crimp those edges.
They’re burning: Your oil is too hot. Turn down the heat and use a thermometer to check the temp.
They’re greasy: Your oil wasn’t hot enough when you added them, or you crowded the pan and dropped the temperature. Fry in small batches.
Bread is soggy: You let them sit in the oil too long, or the oil temperature was too low. They should be golden and crispy in 2-3 minutes per side.
Can’t get them to seal: Your bread might be too dry. Try using slightly fresher bread, or press harder when sealing the edges.
Why These Beat the State Fair Version (Fight Me)
Remember that $12 fried cheesecake sandwich from the fair? These cost maybe $2 each to make at home. TWO DOLLARS. And they’re bigger, fresher, and I can make them in my pajamas without walking around a dusty fairground.
Plus, I can control the filling-to-bread ratio, which at the fair is usually disappointingly low. These are PACKED with creamy strawberry cheesecake filling, the way dessert should be.
My kids now request these for special occasions. My teenager even offered to do extra chores if I’d make them. That’s power.
The Honest Truth About This How to Make Fried Strawberry Cheesecake Sandwiches Recipe
These crispy fried strawberry cheesecake sandwiches aren’t health food. They’re not quick if you count the freezing time. And they involve hot oil which is inherently a little scary.
But they’re worth it. Every crispy, creamy, strawberry-filled bite is worth it.
Are they messy to make? Yes. Will your kitchen smell like fried food for a few hours? Also yes. But will people lose their minds when you serve these? Absolutely.
They’re indulgent, they’re ridiculous, and they taste like a state fair had a baby with a fancy dessert restaurant. And honestly? Sometimes that’s exactly what you need.
Happy frying! (And may your oil stay at 350°F and your edges stay sealed)