French butter cookies are one of those things I thought would be complicated and fancy and require some kind of culinary degree to pull off. Turns out? Dead simple. And I mean embarrassingly simple for something that tastes this good.
I discovered this easy french butter cookies recipe during Christmas last year when I was desperately trying to find something impressive to bring to my in-laws’ holiday party. My mother-in-law is French—like, actually from France, speaks with an accent, judges my cooking kind of French. So the pressure was real.
First batch? Burned around the edges because I got distracted wrapping presents and forgot about them. Second batch? Too thick and kind of doughy in the middle. But the third batch? Chef’s kiss. Even got a “Pas mal” from my mother-in-law, which is basically a standing ovation in French approval terms.
Table of Contents
What Makes These Sable Breton Shortbread Cookies So Special
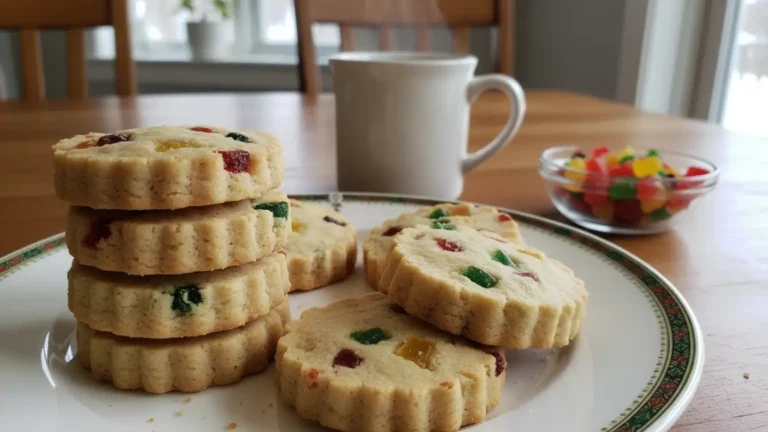
Here’s the thing about classic french sable cookies—they’re not like American butter cookies that are soft and cakey. These are crisp, crumbly, almost sandy in texture (that’s literally what “sablé” means in French—sandy). They literally melt on your tongue, and the butter flavor is SO pronounced that you know you’re eating something made with real ingredients.
I think… no, I know this works better when you use good quality butter. European butter if you can get it, the kind with higher fat content. I use Kerrygold because it’s easy to find at my grocery store and my French mother-in-law approved it, so that’s good enough for me.
The texture is what got me hooked. That crispy outside with the slightly tender middle that just crumbles when you bite into it. And the vanilla flavor? Subtle but definitely there. These aren’t overly sweet either, which makes them perfect with coffee or tea or honestly just eating five of them standing at the counter at 10 PM. Not that I’ve done that. Multiple times.
Why This Homemade French Cookies Recipe Works
Melt in your mouth shortbread isn’t just a catchy phrase—it’s literally what happens. The high butter content and specific technique create this texture that’s completely different from regular cookies. My daughter, who’s picky about everything and currently refuses to eat anything that “looks weird,” devours these.
And they look fancy. Like really fancy. People always assume they came from a bakery. Last month I brought them to a potluck and three people asked which French patisserie I went to. Had to confess I made them in my regular kitchen wearing sweatpants.
Ingredients You Actually Need (Not That Many!)
For the basic recipe:
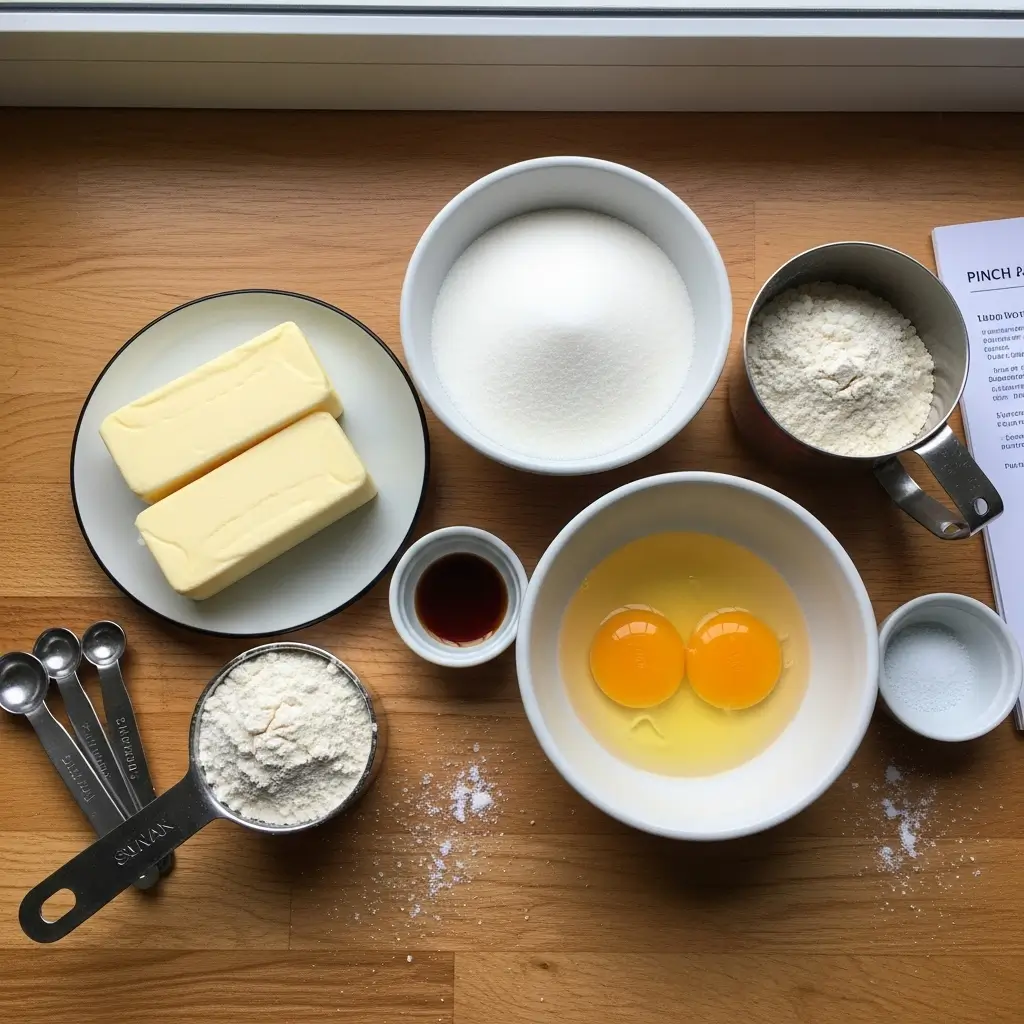
- 1 cup (2 sticks) unsalted butter, room temperature (European butter is best but regular works)
- 2/3 cup granulated sugar
- 2 egg yolks (save the whites for an omelette or something)
- 1 teaspoon pure vanilla extract
- 2 cups all-purpose flour
- 1/2 teaspoon salt (or flaky sea salt if you want to be fancy)
- 1 egg yolk + 1 tablespoon water for egg wash
Optional but delicious additions:
- Lemon zest (about 1 teaspoon)
- Orange zest
- 1/4 teaspoon almond extract
- Coarse sugar for sprinkling on top
Use real vanilla extract, not the imitation stuff. I learned this the hard way when I tried to save money and they tasted kind of chemical-y. My husband still ate them, but I knew they weren’t right.
And about the butter—it MUST be room temperature. Not melted, not cold from the fridge. Room temp so it creams properly with the sugar. I usually leave mine out for like 2 hours before I start baking. If you forget and it’s still cold, you can cut it into small pieces and it’ll soften faster. Don’t microwave it though. Just don’t.
How To Make The Best Butter Cookie Recipe (Step By Step)
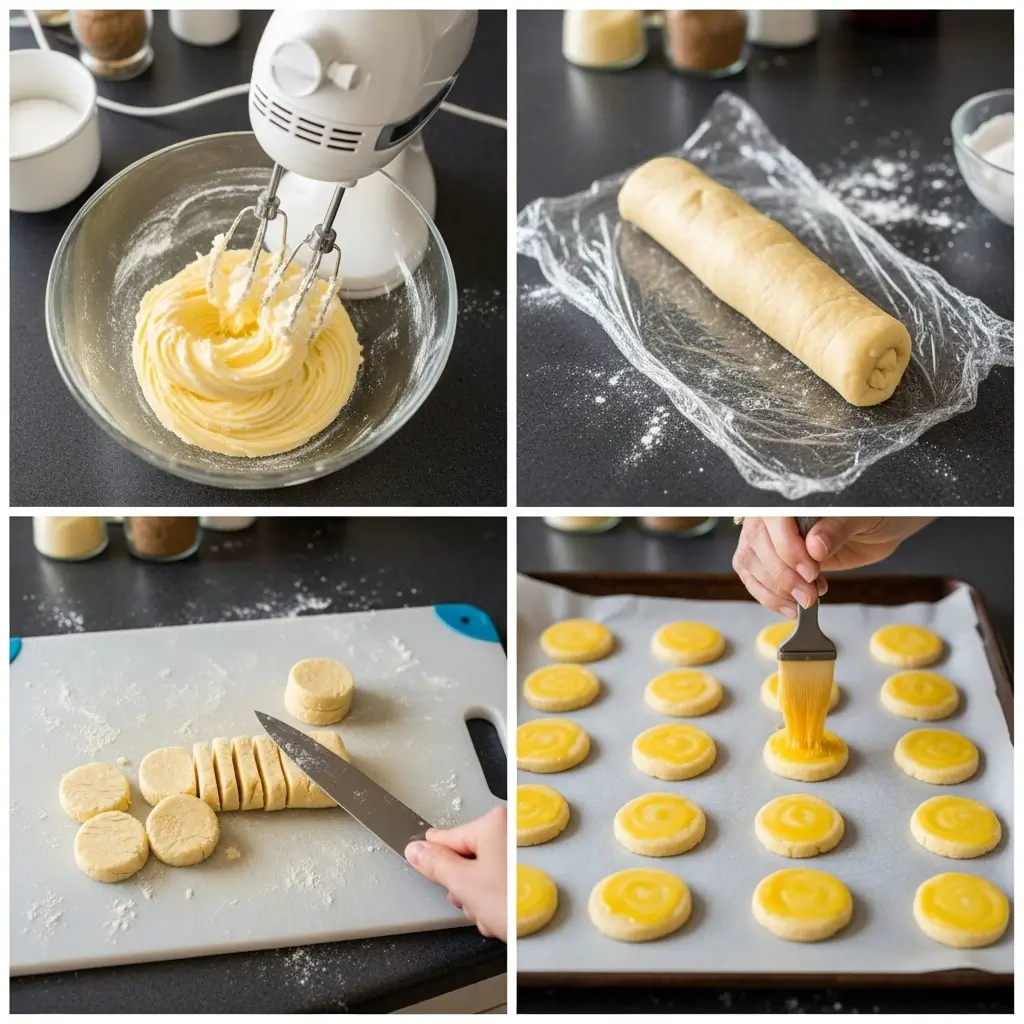
Step 1: Beat the butter and sugar together until it’s light and fluffy. This takes longer than you think—like 3-4 minutes with an electric mixer. Your arm will be tired if you do it by hand (been there, do not recommend). It should look pale and airy, almost like frosting.
Step 2: Add the egg yolks one at a time, mixing well after each addition. Then add your vanilla extract. The mixture might look a bit weird and separated at this point—that’s normal. Don’t panic like I did the first time.
Step 3: In a separate bowl, whisk together the flour and salt. This seems pointless but it actually helps distribute the salt evenly. I skipped this once and got a really salty bite in one cookie. Learn from my mistakes.
Step 4: Add the flour mixture to the butter mixture in two or three additions, mixing on low speed just until combined. Don’t overmix or you’ll develop the gluten and end up with tough cookies instead of tender ones. Mix until you can’t see any more flour streaks, then stop.
Step 5: The dough will be soft and slightly sticky. Dump it onto a piece of plastic wrap and shape it into a log about 2 inches in diameter. Wrap it tightly and refrigerate for at least 2 hours. I usually make the dough the night before and bake the next day because I’m lazy and this fits my schedule better.
Wait, I almost forgot—you can also make this into a disk and roll it out later if you want to use cookie cutters. I do this for Christmas sometimes.
Step 6: When you’re ready to bake, preheat your oven to 350°F. Line a baking sheet with parchment paper. Don’t skip the parchment—these cookies have so much butter they’ll stick to bare metal pans.
Step 7: Unwrap your chilled dough log and slice it into 1/4-inch thick rounds. If the dough is too hard to slice, let it sit at room temperature for 10 minutes. If it’s too soft and smooshy, stick it back in the fridge for 15 minutes. It should slice cleanly without cracking or squishing.
Step 8: Place cookies on your prepared baking sheet about 1 inch apart. They don’t spread much. Brush the tops with egg wash (1 egg yolk mixed with 1 tablespoon water). This gives them that gorgeous golden sheen. You can use a fork to create a crosshatch pattern on top like traditional sablé bretons—I do this sometimes when I’m feeling fancy.
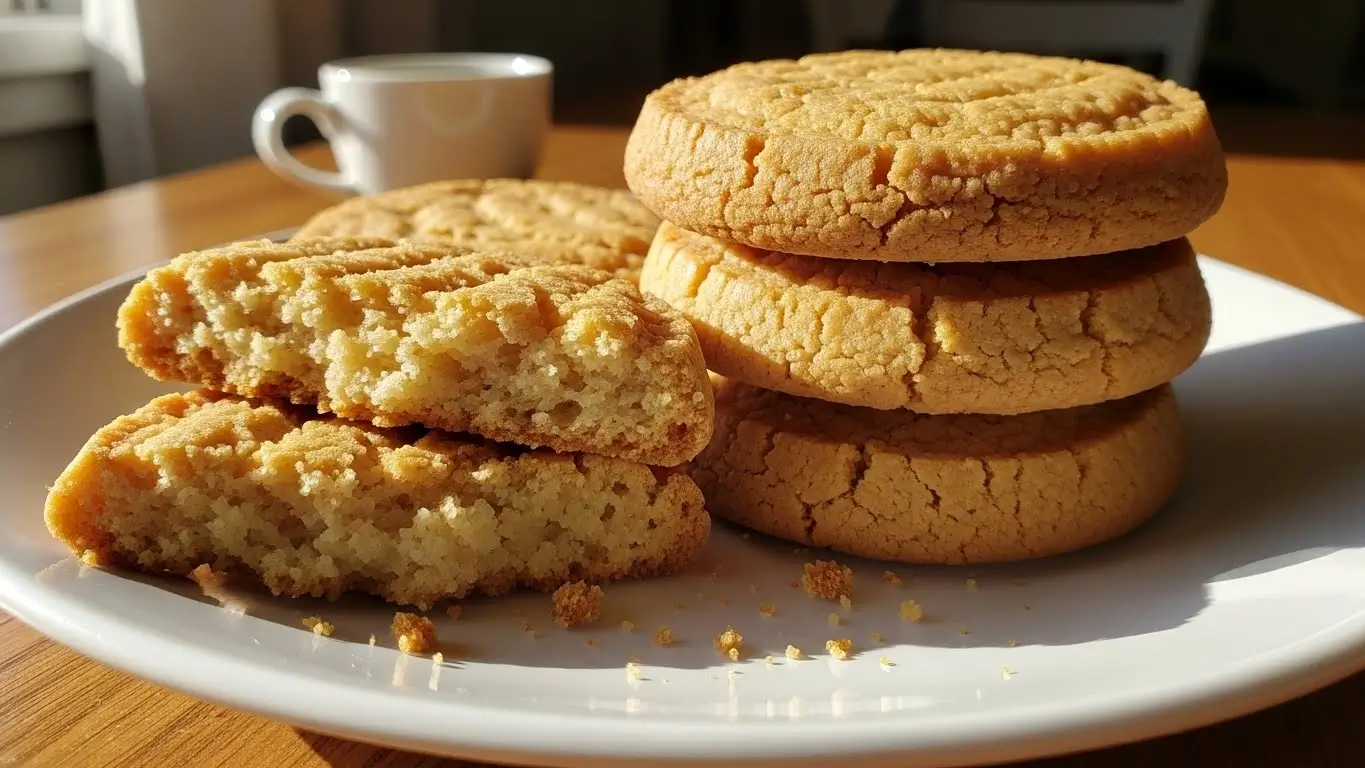
Step 9: Bake for 12-15 minutes until the edges are just starting to turn golden. The centers might look slightly underdone—that’s okay. They’ll firm up as they cool. I set my timer for 12 minutes and then watch them like a hawk because the window between perfect and too brown is tiny.
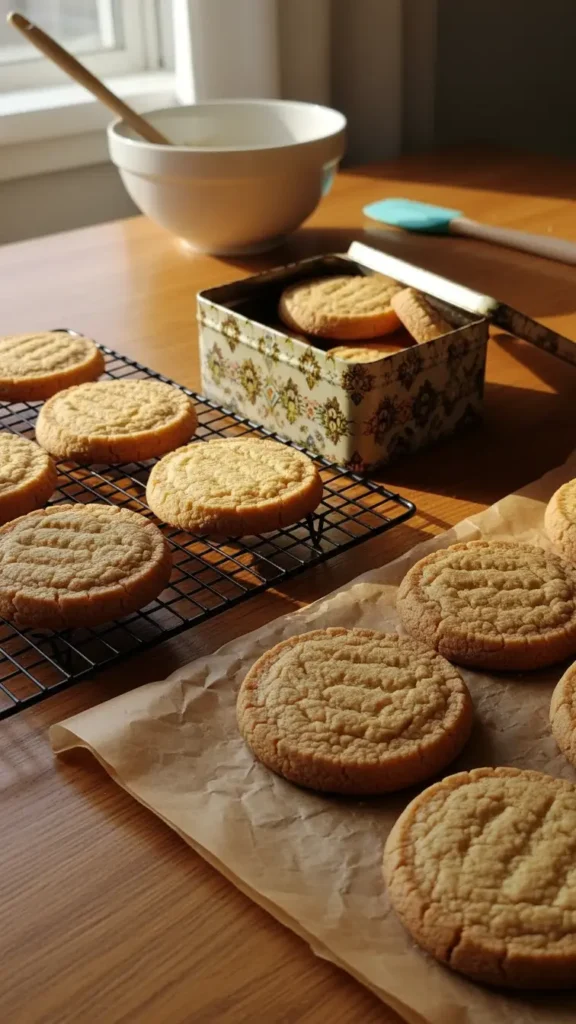
Step 10: Let them cool on the baking sheet for 5 minutes, then transfer to a wire rack. They’ll be soft when warm but will crisp up beautifully as they cool.
Tips For Perfect Crispy Butter Cookies
The butter temperature thing is crucial. Room temperature. Not negotiable. I’ve tried making these with cold butter (disaster), melted butter (weird greasy texture), and slightly warm butter (spread too much). Room temp is the sweet spot.
Chilling the dough matters. I know it’s annoying to wait, but this step is important. The chilled dough slices cleanly, the cookies hold their shape better, and the texture comes out right. I’ve tried skipping this step exactly once and regretted it immediately.
Don’t overbake. These cookies continue cooking on the hot pan after you remove them from the oven. Take them out when they’re just barely golden at the edges. If they’re brown all over, they’ll be too hard and might taste slightly burned.
European butter really does make a difference. Higher fat content means more flavor and better texture. But if you can’t find it or don’t want to spend the extra money, regular unsalted butter works fine. I’ve made these probably 30 times with regular Land O’Lakes butter and they’re still delicious.
What To Do With These French Cookies With Vanilla
These buttery shortbread recipe cookies are perfect for:
- Christmas cookie platters (they look elegant and keep well)
- Gift giving in cute tins or bags
- Afternoon tea or coffee
- Dunking in hot chocolate (this is amazing, trust me)
- Eating straight from the cooling rack when no one’s looking
I usually make a double batch during the holidays because they disappear fast. And the dough freezes beautifully—you can keep a wrapped log in the freezer for up to 3 months, then slice and bake whenever you want fresh cookies.
My neighbor brings these to every book club meeting now. Says they make her look like a fancy baker when really she just slices frozen dough and bakes for 15 minutes. Smart woman.
Storage And Make-Ahead Tips
Store these in an airtight container at room temperature for up to 2 weeks. They actually get better after a day or two—the flavors meld and the texture becomes even more crisp and short.
The dough keeps in the fridge for up to 5 days before baking, or freeze it for up to 3 months like I mentioned. This makes them perfect for entertaining because you can have cookie dough ready to go and bake fresh batches as needed.
I usually have at least one log of this dough in my freezer at all times now. It’s become my emergency “someone’s coming over and I need to look like I have my life together” solution.
Why This Recipe Changed My Cookie Game
These simple butter cookie recipe cookies made me realize that French baking isn’t all complicated and scary. Sometimes it’s just really good ingredients, proper technique, and patience (the hardest part for me).
The first time I made these successfully and my very French mother-in-law asked for the recipe, I felt like I’d won an Olympic medal. She never asks for recipes. NEVER. Now I make them for every family gathering and I swear she judges me less about other things.
Honestly got a little teary-eyed when my daughter told her teacher I made “the best cookies in the world.” Kids are brutally honest, so I’m taking that compliment and running with it.
If I can make these without completely messing them up (after a few practice rounds), anyone can. They’re forgiving once you understand the basics. And even when they’re not perfect, they still taste amazing because butter and sugar and vanilla are a hard combination to ruin.
Let me know how yours turn out! Seriously, drop a comment and tell me if your family loves them as much as mine does. And if you have any secret tips for making them even better, share them because I’m always looking to up my game. 🍪✨