Okay, so I burned my first batch of chocolate crinkle cookies. Like, really burned them.
It was last December—right before my daughter’s holiday party at school—and I thought I could multitask while baking. Spoiler alert: I can’t. The smoke alarm went off, the dog started barking, and I had to open every window in the house in 30-degree weather. My neighbor probably thought I was having a crisis.
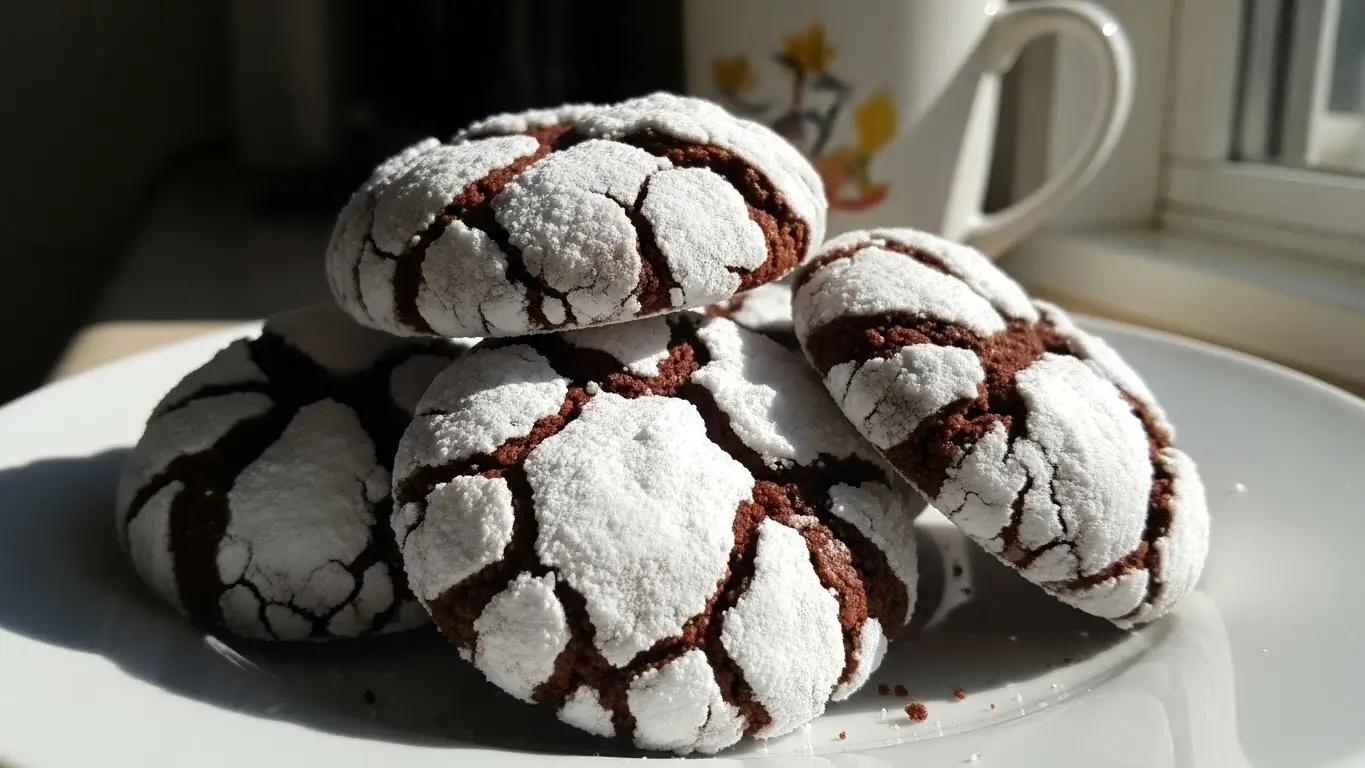
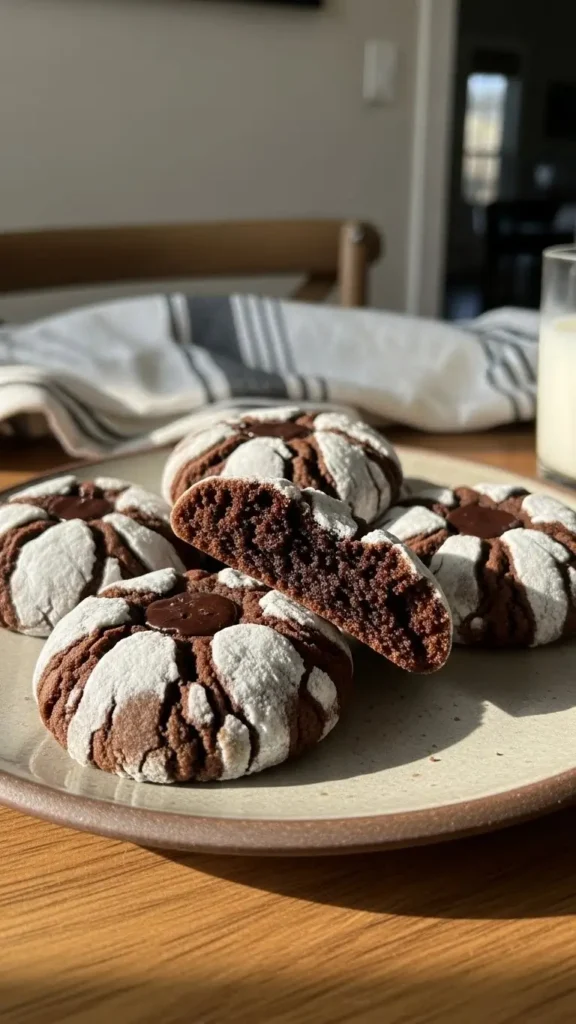
But here’s the thing about chocolate crinkle cookies—once you nail them, they’re absolutely perfect. Crispy on the outside, soft and fudgy on the inside, with those gorgeous cracks covered in powdered sugar that make them look like you spent hours on them. (You didn’t. That’s the secret.)
Table of Contents
Why I’m Obsessed with These Chocolate Crinkle Cookies
I’ve tried probably fifteen different chocolate crinkle cookies recipes over the years. Some were too cakey. Some spread into weird flat discs. Some—and I’m not kidding—tasted like straight cocoa powder with no sweetness whatsoever.
This recipe? It’s the one. The best chocolate crinkle cookies I’ve ever made, and I’m including my grandma’s version in that statement. (Sorry, Grandma.)
What makes these different is the texture. They’re chewy without being dense, chocolatey without being overwhelming, and they actually crackle properly. You know those Pinterest photos where the cookies have perfect white cracks running through them? Yeah, mine actually look like that now. Didn’t used to. Used to look like sad chocolate lumps.
The Story Behind My Perfect Batch
I think I figured out how to make chocolate crinkle cookies properly around my fourth or fifth attempt. It was 2 AM (don’t ask why I was baking at 2 AM—insomnia is weird), and I was frustrated because every recipe I’d tried said “they’ll crack beautifully!” and then mine just… didn’t.
Turns out the secret is in the chilling time and the double coating in powdered sugar. Who knew? Well, apparently everyone except me.
My 8-year-old daughter now requests these every single week. She calls them “the crackly cookies” and insists they’re better than store-bought. Coming from a kid who normally prefers Oreos, that’s high praise.
What You’ll Need for These Chocolate Crinkle Cookies from Scratch
Okay, ingredient time. And look, I’m gonna be honest—don’t cheap out on the cocoa powder. I did that once with some generic brand and they tasted like chocolate-flavored sadness.
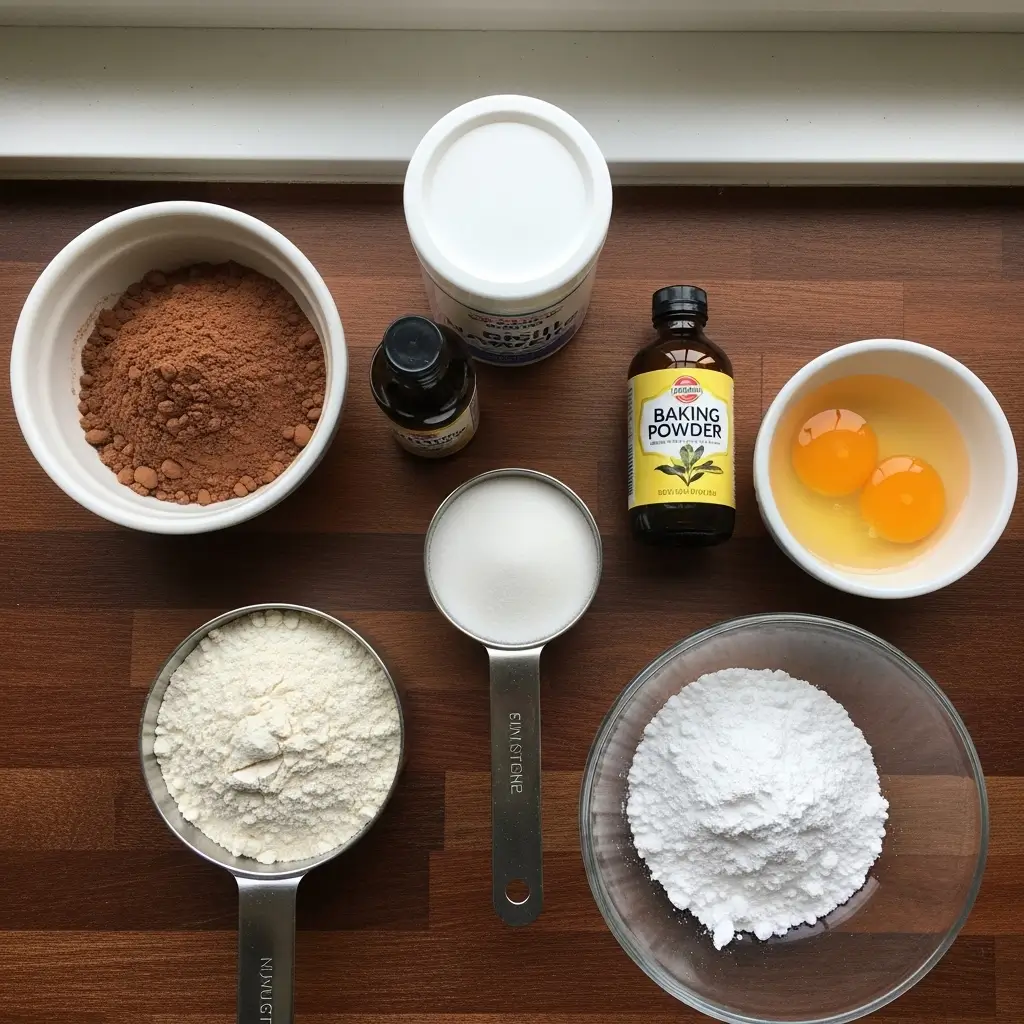
Dry Stuff:
- 1 cup all-purpose flour (just the regular King Arthur kind works fine)
- ½ cup unsweetened cocoa powder (I use Hershey’s Special Dark because I like things extra chocolatey)
- 1 teaspoon baking powder
- ¼ teaspoon salt (don’t skip this—it makes the chocolate pop)
Wet Stuff:
- ½ cup vegetable oil (or melted coconut oil if you’re fancy)
- 1 cup granulated sugar
- 2 large eggs (room temperature works better, but cold works too if you’re impatient like me)
- 1 teaspoon vanilla extract (the real stuff, not imitation—trust me on this one)
For Coating:
- ½ cup powdered sugar (you’ll need this—it’s non-negotiable for the crackle effect)
- Extra powdered sugar for your second coating (learned this the hard way)
Shopping note: Last time I made these, my grocery store was out of cocoa powder because apparently everyone in my town decided to bake simultaneously. Had to go to three different stores. Plan ahead, people.
How to Make Easy Chocolate Crinkle Cookies (Step-by-Step)
Step 1: Mix the Dry Ingredients
Grab a medium bowl and whisk together your flour, cocoa powder, baking powder, and salt. This is the boring part, I know. But it matters because you don’t want clumps of cocoa powder in your cookies. That’s just… not great.
Actually, you know what? Sift the cocoa powder if you can. I never did this before, but my sister-in-law (who’s like, annoyingly good at baking) told me it makes a difference. And she was right. Ugh.
Step 2: Mix the Wet Ingredients
In a larger bowl, whisk together the oil and sugar until it’s combined. It won’t look pretty—it’ll look grainy and weird. That’s normal.
Add your eggs one at a time. (Why do recipes always say “one at a time”? I used to just dump them both in. Turns out it actually matters for texture. Who knew?)
Then add vanilla. I usually add a little extra because I’m a vanilla person. Maybe like 1½ teaspoons? I don’t measure anymore, honestly.
Step 3: Combine Everything
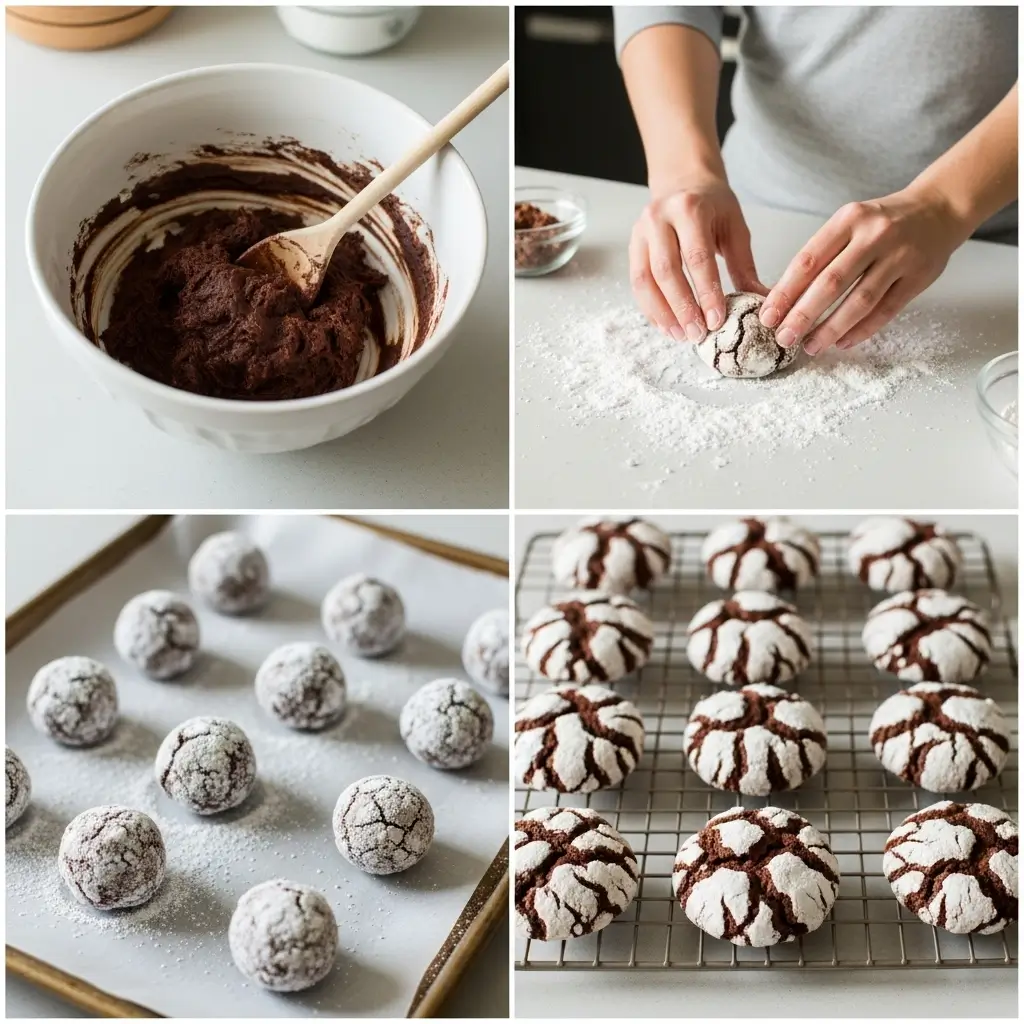
Pour the dry ingredients into the wet ingredients and stir with a wooden spoon until just combined. Don’t overmix! (I know everyone says this, but seriously—overmixed cookies are tough cookies, and not in a good way.)
The dough will be really sticky and almost look like brownie batter. First time I made these I thought I’d messed up because it seemed too wet. Nope. That’s exactly how it should look.
Step 4: The Critical Chilling Part
Here’s where most recipes fail you. They say “chill for 30 minutes.” That’s a lie.
For chewy chocolate crinkle cookies with proper cracks, you need to chill the dough for AT LEAST 2 hours. I usually do 3-4 hours, or overnight if I’m planning ahead.
Cover the bowl with plastic wrap and stick it in the fridge. Go watch Netflix. Do laundry. Whatever. Just let it chill properly.
Why does this matter? Because if the dough’s too warm, the cookies spread before they can crack. You’ll end up with flat, sad cookies. Been there. Cried about it.
Step 5: Shape and Coat
Preheat your oven to 350°F. (Oh wait, I should’ve said that earlier. Whatever. Do it now.)
Line two baking sheets with parchment paper. Don’t skip the parchment—these stick like crazy otherwise.
Now—and this is important—roll the dough into balls about 1 tablespoon each. I use a cookie scoop because I like them all the same size, but you can eyeball it.
Roll each ball in powdered sugar. Like, really coat them. Then—here’s the secret—roll them AGAIN in powdered sugar. Double coating is what creates those dramatic white cracks. Single coating and you’ll get wimpy cracks. (Ask me how I know.)
Step 6: Bake These Babies
Place cookies about 2 inches apart on your baking sheets. They spread a bit, but not too much.
Bake for 10-12 minutes. They’ll look slightly underdone in the center—that’s what you want! They’ll firm up as they cool.
Set a timer. Seriously. I’ve burned too many batches because I thought “I’ll remember.” I never remember.
Step 7: Cool and Try Not to Eat Them All
Let them cool on the baking sheet for 5 minutes, then transfer to a cooling rack.
This is the hardest part because they smell AMAZING and you’ll want to eat one immediately. But if you do, you’ll burn your mouth. (I do this every single time anyway.)
Why These Are the Best Chocolate Crinkle Cookies
What makes this recipe work when others don’t? A few things I’ve figured out through trial and error:
The oil vs. butter debate: I used to make these with butter because that’s what most cookie recipes use. But oil keeps them softer and chewier. Butter made them too cakey for my taste.
Double sugar coating: This isn’t me being extra—it’s science. The first coating partially absorbs into the cookie as it bakes. The second coating stays white and creates contrast.
Proper chilling: Cannot stress this enough. Room temperature dough = flat cookies. Cold dough = crackly, perfect cookies.
Don’t overbake: They should look slightly underdone when you take them out. They’ll finish cooking on the baking sheet. If they look fully cooked in the oven, they’ll be overbaked when cool.
Tips for Perfect Chocolate Crinkle Cookies Every Time
If your cookies don’t crack: Your dough wasn’t cold enough. Next time, chill longer. Or pop the rolled balls in the freezer for 15 minutes before baking.
If they taste too bitter: You used too much cocoa or not enough sugar. I sometimes add an extra 2 tablespoons of sugar if I’m using really dark cocoa.
If they spread too much: Either your dough was too warm, or you overmixed. Could also be old baking powder—check the expiration date.
Make ahead tips: You can freeze the dough balls (after coating in sugar) and bake them straight from frozen. Add 2 extra minutes to baking time. I do this all the time for emergency cookies.
Storing Your Homemade Chocolate Crinkle Cookies
These keep in an airtight container for about 5 days. (Theoretically. Mine never last that long because my family attacks them.)
You can also freeze baked cookies for up to 3 months. Just layer them between parchment paper so they don’t stick together.
For make ahead chocolate crinkle cookies, freeze the dough balls before baking. Then you can have fresh cookies anytime without all the mixing and waiting.
Final Thoughts on This Classic Chocolate Crinkle Cookies Recipe
Look, I’m not saying these are life-changing or anything dramatic like that. But they’re really, really good. And they’re way easier than they look, which is basically the best thing you can say about a recipe.
My daughter’s teacher asked for the recipe after the holiday party (the one where I almost served burnt cookies). My neighbor Sarah makes them every Christmas now. My mom says they’re even better than her old recipe from the 1970s.
And honestly? I’m just proud I finally figured out how to make chocolate crinkle cookies that actually work. Only took me five attempts and one fire alarm incident.
Happy baking! And seriously, don’t skip the double coating in powdered sugar. That’s the whole point of these cookies. 🙂