Cherry Snowball Cookies: The Holiday Cookie I Almost Gave Up On
Cherry Snowball Cookies became my mission after my mother-in-law casually mentioned she’d had them at some church bake sale and they were “probably the best cookies she’d ever tasted.” Challenge accepted, I guess?
Four failed batches later (one batch spread into flat pancakes, another was so dry they could’ve been used as hockey pucks), I finally figured out these buttery, melt-in-your-mouth cookies. And now? Now my mother-in-law asks ME to bring them to every family gathering. Small victory.
Table of Contents
How These Cherry Snowball Cookies Almost Broke Me
Look, I’m gonna be honest—I thought these would be easy. They’re basically Mexican wedding cookies with cherries, right? How hard could that be?
Turns out, very hard if you don’t know what you’re doing.
First attempt, I used regular maraschino cherries straight from the jar. Disaster. Complete disaster. The moisture from the cherries leaked into the dough and turned my cookies into wet, pink-tinged blobs that spread all over the baking sheet and merged into one giant cookie pancake.
My husband walked into the kitchen, looked at the sheet, and said “abstract art?” I threw a dish towel at him.
Version two, I tried to “fix” it by adding way more flour. The cookies held their shape this time but tasted like sweet chalk. My daughter took one bite and politely asked if she could have an Oreo instead.
By attempt three, I’d figured out you need to drain AND dry the cherries really well, and the dough needs to be cold before you shape it. Also, the powdered sugar coating needs to happen while they’re still warm or it won’t stick properly.
Why doesn’t anyone put these details in recipes? WHY?
Why This Cherry Snowball Cookie Recipe Actually Works
Here’s the thing about snowball cookies (also called Russian tea cakes, Mexican wedding cookies, whatever you want to call them)—they’re temperamental. The butter-to-flour ratio matters. The temperature of your dough matters. How much you handle the dough matters.
Adding cherries makes it even trickier because you’re introducing moisture and color into a dough that’s supposed to be dry and pristine white.
But when you get it right? They’re incredible. Buttery, tender, with a pop of cherry flavor and that classic powdered sugar coating that gets all over your black shirt no matter how careful you are.
These are the cookies that disappear first at cookie exchanges. The ones people take pictures of. The ones that make your mother-in-law admit you might actually be a decent baker.
The Ingredients for Cherry Snowball Cookies (Shopping Drama Included)
Alright, here’s what you need for these cookies. Pay attention to the cherry notes because that’s where I went wrong initially.
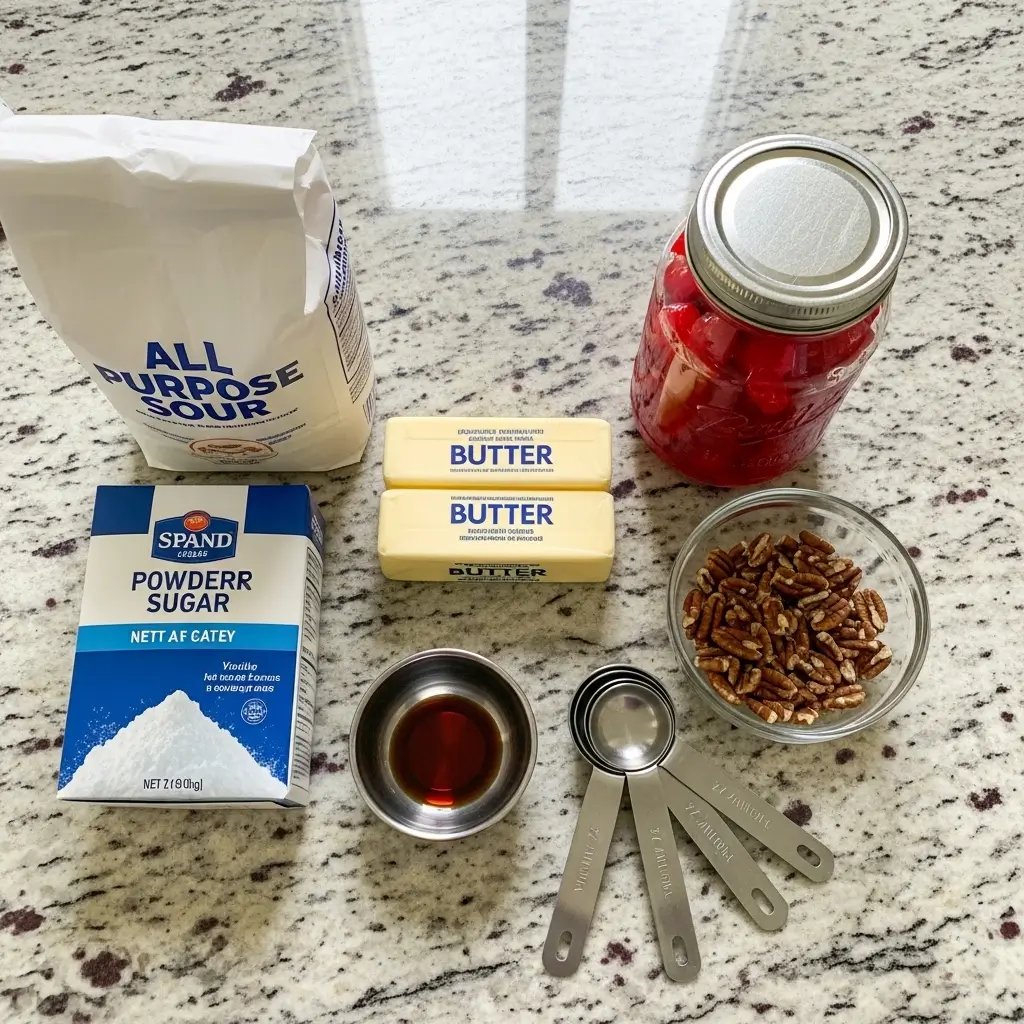
For the Cookies:
- 1 cup (2 sticks) butter, softened (not melted, not cold—room temp)
- 1/2 cup powdered sugar, plus more for coating
- 1 teaspoon vanilla extract
- 1/4 teaspoon almond extract (optional but really good)
- 2 cups all-purpose flour
- 1/4 teaspoon salt
- 1/2 cup finely chopped maraschino cherries, WELL DRAINED
- 1/2 cup finely chopped pecans or walnuts (optional but adds texture)
For Coating:
- 1-2 cups powdered sugar
CRITICAL NOTE about the cherries: You need to drain them, then pat them dry with paper towels, then let them sit on fresh paper towels for like 10 minutes. I’m not kidding. Wet cherries will ruin your cookies. I learned this the expensive way.
Also, chop them FINE. Like, really fine. Big chunks throw off the texture and can make the cookies fall apart.
How to Make These Cherry Snowball Cookies (Without Crying)
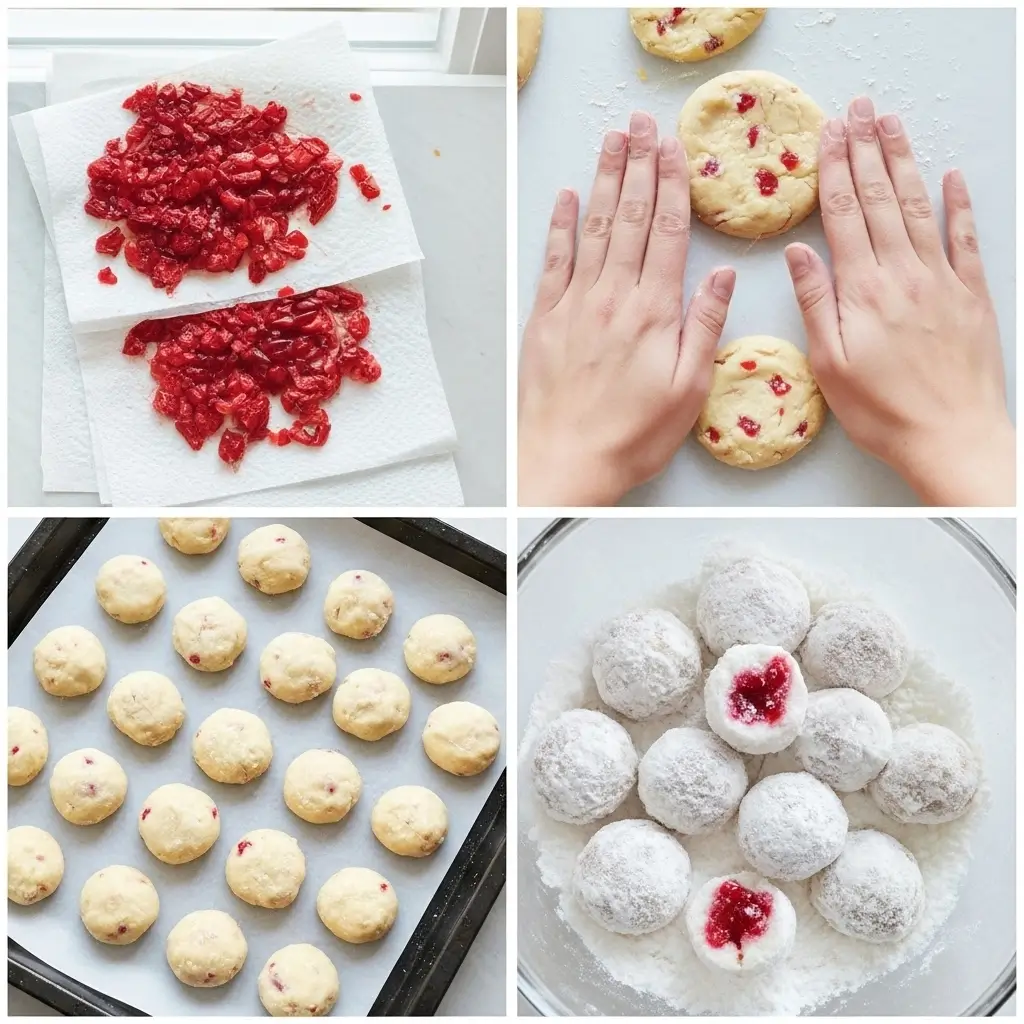
Step 1: Prep Those Cherries Before you do ANYTHING else, drain your cherries and start drying them. Lay them out on paper towels and pat them dry. While you’re doing other steps, keep checking on them and patting them dry. They need to be as dry as possible.
Chop them into tiny pieces. Smaller than you think. Trust me.
Step 2: Make the Dough In a large bowl (or stand mixer if you’re fancy), beat softened butter and 1/2 cup powdered sugar until light and fluffy. This takes about 2-3 minutes. Add vanilla and almond extract if using.
Step 3: Add Dry Ingredients Mix in flour and salt on low speed until just combined. Don’t overmix or your cookies will be tough. The dough should come together but still be crumbly.
Step 4: Add Cherries (The Crucial Part) Gently fold in your dried, chopped cherries and nuts if using. The dough will be pretty stiff and that’s normal. If it feels too wet (which shouldn’t happen if you dried the cherries properly), add a tablespoon more flour.
Step 5: Chill the Dough Cover the bowl with plastic wrap and refrigerate for at least 30 minutes. I usually do an hour because patience is not my strong suit and I need the enforced break.
Cold dough = cookies that hold their shape. Warm dough = cookie pancakes.
Step 6: Shape the Cookies Preheat your oven to 350°F. Line baking sheets with parchment paper.
Roll the dough into 1-inch balls. If the dough is sticking to your hands, that means it’s too warm—pop it back in the fridge for 10 minutes.
Place balls about 2 inches apart on baking sheets. They don’t spread much but better safe than sorry.
Step 7: Bake Bake for 12-15 minutes until the bottoms are just barely starting to turn golden. The tops will still look pale—that’s what you want. Don’t overbake or they’ll be dry.
Step 8: The Powdered Sugar Coating This is where timing matters. Let the cookies cool on the baking sheet for about 5 minutes—they need to be warm but not hot enough to melt the sugar completely.
Roll warm cookies in powdered sugar until completely coated. Place on a wire rack to cool completely.
Once they’re fully cool, roll them in powdered sugar AGAIN. This double coating gives you that classic thick white layer that makes them look like actual snowballs.

Real Talk About These Cherry Snowball Cookies
The cherry moisture thing is real: I cannot stress this enough. Wet cherries will ruin everything. Dry them thoroughly.
Cold dough is crucial: If your kitchen is hot, keep the dough in the fridge and only take out what you need to shape at a time.
Size matters: Make them all the same size so they bake evenly. I use a cookie scoop to keep them consistent.
The double sugar coating: Some people skip the second coating. Those people are wrong. The double coating is what makes these cookies special.
Storage: Keep these in an airtight container at room temperature. They’ll last about a week, though mine never make it past three days. Don’t refrigerate them—it makes them hard.
Making Cherry Snowball Cookies for Cookie Exchanges
First time I brought these to a cookie exchange, someone asked if I’d bought them from a bakery. I said “yes” because I was insecure about my baking, then my friend who’d watched me stress-bake them the night before loudly announced “NO SHE DIDN’T, SHE MADE THEM AND CURSED A LOT.”
Thanks, Jennifer.
But yeah, these are impressive-looking cookies. The bright pink flecks of cherry in the white dough, covered in powdered sugar—they photograph well, they taste amazing, and they’re different from the usual chocolate chip situation everyone brings.
Just warn people that the powdered sugar will get EVERYWHERE. On their hands, their clothes, the table, somehow on the ceiling. It’s part of the charm.
When Your Cherry Snowball Cookies Go Wrong
Cookies spread too much: Your butter was too soft, or you didn’t chill the dough long enough. Also check that your cherries were actually dry.
Cookies are too dry and crumbly: You overbaked them, or you added too much flour, or you overmixed the dough.
Cookies are pink instead of white: Your cherries weren’t dry enough and the color bled into the dough. Dry them better next time.
Powdered sugar won’t stick: You let the cookies cool too much before the first coating. They need to be warm for the sugar to stick.
Cookies fall apart: Your cherries were cut too big, or you undermixed the dough. Make sure everything is evenly incorporated.
Why These Beat Regular Snowball Cookies
Regular snowball cookies are fine. They’re classic. But let’s be real—they’re kind of boring after the first one.
These Cherry Snowball Cookies have that little pop of cherry flavor that makes each bite interesting. The slight tartness from the cherry balances out all that butter and sugar. And the pink flecks make them festive without trying too hard.
My kids actually eat these, which is saying something because they usually ignore any cookie that isn’t loaded with chocolate chips. My son calls them “fancy cookies” which I’m choosing to take as a compliment even though he’s seven and thinks Lunchables are fancy.
The Honest Truth About This Recipe
These Cherry Snowball Cookies aren’t beginner-friendly. There’s technique involved, timing matters, and if you skip steps or rush things, they won’t turn out right.
But if you follow the instructions—especially the part about drying those cherries—you’ll end up with cookies that look bakery-quality and taste even better.
Are they worth the effort? For special occasions, absolutely. For a random Tuesday? Probably just eat store-bought Chips Ahoy and save yourself the stress.
But when you want to impress someone, or win a cookie exchange, or prove to your mother-in-law that you’re not completely hopeless in the kitchen? These are your cookies.
Happy baking! (And may your cherries be dry and your powdered sugar stay on the cookies)