Okay, so I’m gonna be honest with you. I burned this thing twice before I figured out what I was doing wrong. And by burned, I don’t mean the intentional burnt top that makes basque cheesecake so famous—I mean like, smoke alarm going off, kitchen smelling weird for two days kind of burned.
But here’s the thing… once you get it right? This is hands down the best cheesecake you’ll ever make. Like, better than any restaurant version I’ve tried. And I’ve tried a LOT because I became slightly obsessed after my first bite in a random bakery last spring.
Table of Contents
What Even IS Basque Cheesecake?
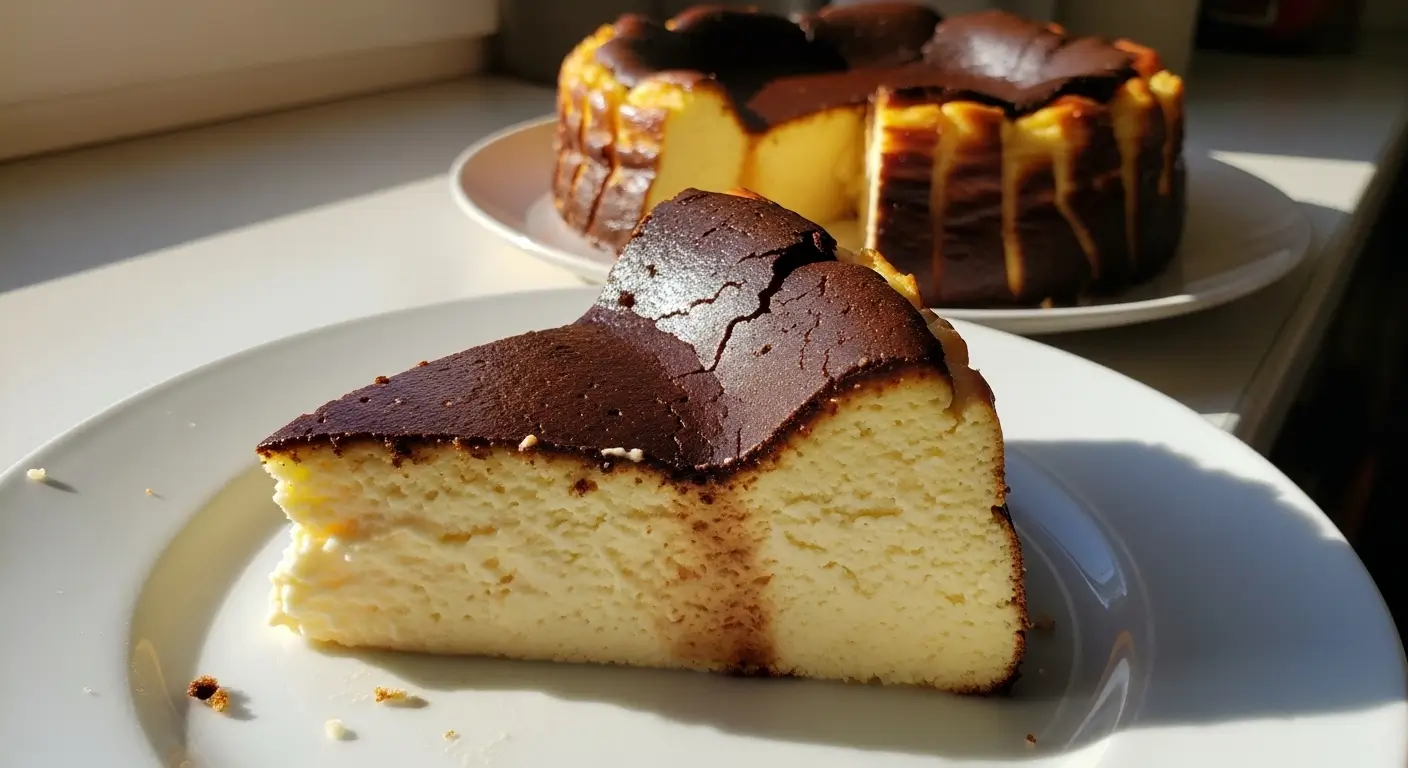
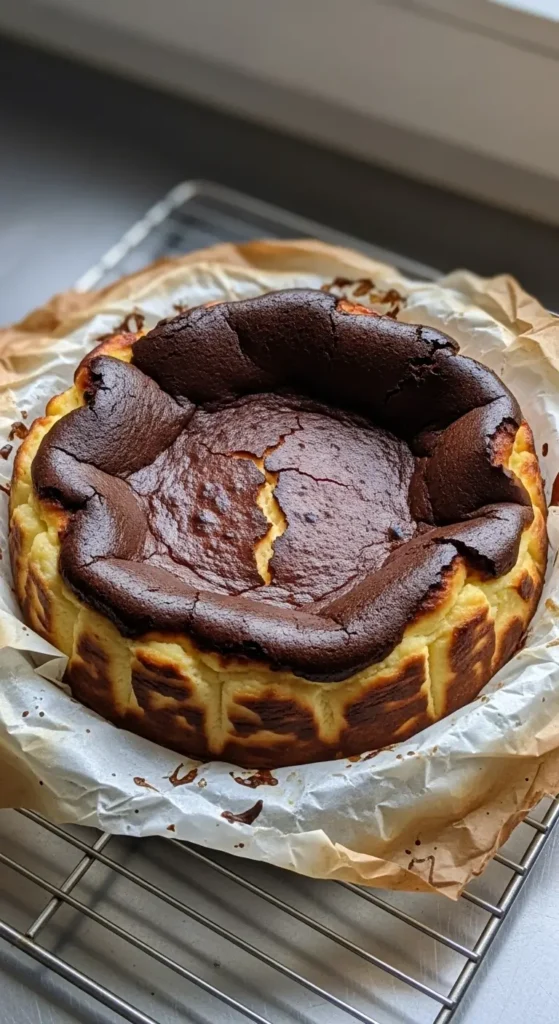
So if you’ve never heard of basque cheesecake (also called burnt basque cheesecake or San Sebastian cheesecake), let me catch you up. It’s this Spanish dessert that looks absolutely terrible when you pull it out of the oven. I’m serious. It’s cracked, sunken in the middle, and has this dark caramelized top that looks like you forgot about it.
But that’s the POINT.
The outside is supposed to be deeply browned (almost burnt, hence the name), while the inside stays creamy and custardy. It’s like if regular cheesecake and crème brûlée had a baby. No crust, no water bath, no fuss. Just pure, simple ingredients baked at high heat.
My neighbor Sarah thought I’d ruined it the first time she saw it cooling on my counter. She was trying to be nice about it too, like “Oh, well… I’m sure it tastes good?” Made me laugh so hard.
Why This Easy Basque Cheesecake Recipe Is Different
Look, I’ve tried maybe seven different recipes for this. Some were too eggy. Some never set properly in the middle. One was so sweet I couldn’t finish a slice (and I have a serious sweet tooth, so that’s saying something).
This creamy basque cheesecake recipe is a combination of everything I learned from those failures. And trust me, there were plenty of failures.
The key differences that make this work:
- Room temperature ingredients (learned this the hard way)
- High oven temperature but not TOO high
- Parchment paper that goes up the sides of your pan
- Not overmixing (this was my biggest mistake initially)
Ingredients for Basque Cheesecake
Here’s what you need for this homemade basque cheesecake. Nothing fancy, I promise.
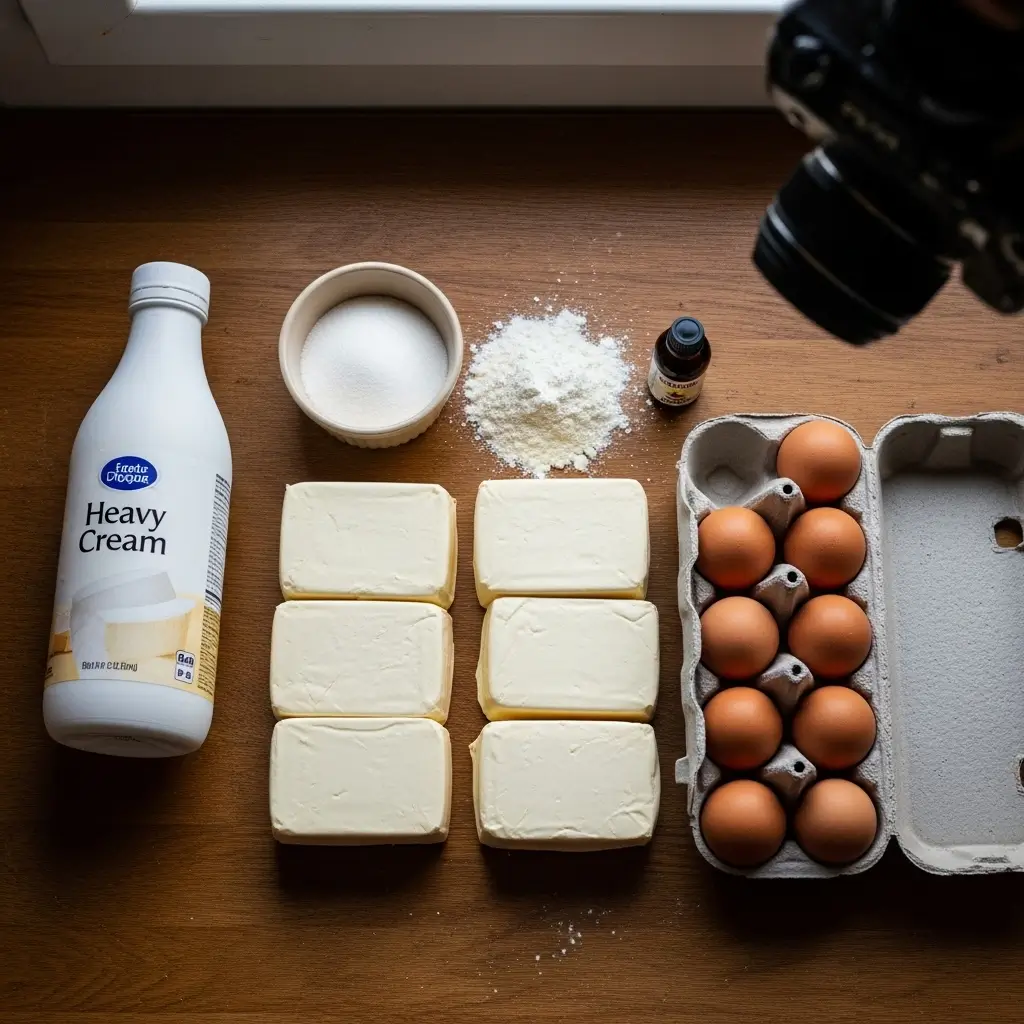
Main Ingredients:
- 2 pounds (32 oz) cream cheese – I use Philadelphia, full fat. Don’t even think about using low-fat
- 1½ cups granulated sugar
- 6 large eggs, room temperature (seriously, room temp matters)
- 2 cups heavy cream
- 1 tablespoon vanilla extract
- 2 tablespoons all-purpose flour
- Pinch of salt
That’s it. Seven ingredients.
Now, about that cream cheese… I tried using a cheaper store brand once to save like two dollars. Don’t do that. The texture was completely off. Philadelphia or a good quality cream cheese is worth it here.
And the eggs? If you’re like me and forget to take them out ahead of time, just put them in a bowl of warm (not hot!) water for about 10 minutes. Works every time.
How to Make Basque Cheesecake (The Real Way)
Okay, here we go. This is where I messed up multiple times, so learn from my mistakes.
Step 1: Prep Your Pan
Preheat your oven to 400°F. Yeah, that’s hot. That’s the point.
Take a 9 or 10-inch springform pan and line it with parchment paper. But here’s the trick—let the parchment come up and over the sides by at least 2 inches. It’ll look wrinkly and messy. That’s FINE. Actually, it’s perfect. Those wrinkles give the cheesecake character.
I tried using a smooth-lined pan once because I thought it would look prettier. The edges stuck and it was a disaster.
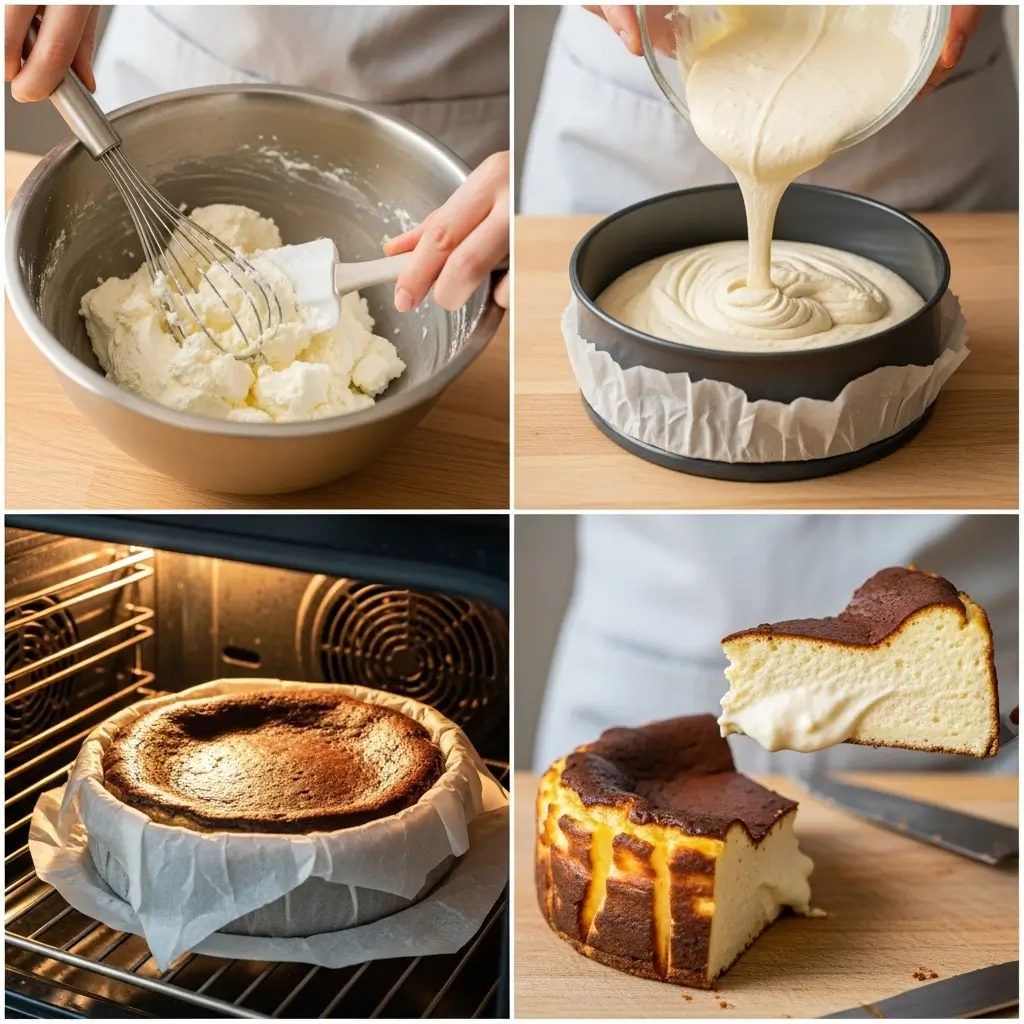
Step 2: Beat the Cream Cheese and Sugar
Put your room temperature cream cheese and sugar in a stand mixer (or use a hand mixer, that works too). Beat it for about 2-3 minutes until it’s smooth and the sugar has dissolved.
Scrape down the sides. I always forget this step and then find chunks of unincorporated cream cheese later. So annoying.
Step 3: Add Eggs One at a Time
This is important—add your eggs ONE AT A TIME. Mix after each addition until just combined.
I got impatient once and dumped all six eggs in at once. The texture was weird and separated-looking. Just… don’t rush this part.
Step 4: Add Heavy Cream and Vanilla
Pour in your heavy cream and vanilla extract. Mix on low speed until everything is combined. The mixture will be pretty liquid-y. That freaked me out the first time, but it’s supposed to be that way.
Step 5: Add Flour
Sprinkle the flour and salt over the mixture. Mix for like 10 seconds. Literally just until you don’t see flour anymore. Overmixing here makes it dense (ask me how I know).
Step 6: Pour and Bake
Pour the batter into your prepared pan. It’ll fill up pretty high, which is normal.
Bake at 400°F for about 50-60 minutes. Now here’s where it gets tricky… you want the top to be deeply caramelized—like, dark golden brown, almost black in some spots. The center should still jiggle when you shake the pan. THAT’S WHAT YOU WANT.
I know it looks underdone. I know you’ll want to bake it longer. Don’t. Trust me on this one. It’ll set as it cools.
Step 7: Cool Completely
This is the hardest part. Let it cool to room temperature in the pan. It’ll take like 2-3 hours. Then refrigerate it overnight.
I tried cutting into it after just 3 hours once because I was having people over. It was basically soup in the middle. We ate it with spoons like pudding. Still delicious, but not exactly what I was going for.
Tips for the Best Basque Cheesecake
After making this burnt basque cheesecake probably 15 times now (yes, really), here’s what I’ve learned:
Temperature is everything. If your ingredients are cold, the texture won’t be right. I set everything out for at least an hour before starting.
Don’t open the oven door. I know you want to check on it. I know that burnt top looks scary. But opening the door drops the temperature and affects how it bakes.
It’s supposed to crack and sink. The first time mine cracked in the middle, I thought I’d failed. Nope. That’s literally what a basque cheesecake san sebastian style looks like.
Serve it at room temperature. Take it out of the fridge about an hour before serving. The flavors are so much better when it’s not ice cold.
What This Basque Cheesecake Viral Recipe Tastes Like
So remember how I said it’s like cheesecake and crème brûlée had a baby? The caramelized top has this slightly bitter, deeply sweet flavor from the burnt sugar. The edges are more set, almost like a traditional baked cheesecake.
But that center? That creamy basque cheesecake center is pure magic. It’s custardy, silky, rich without being heavy. My mom said it reminds her of a really good flan, but cheesecake-flavored.
My 12-year-old nephew, who claims he hates cheesecake, ate two pieces. Then asked if I could make it for his birthday instead of a regular cake. That’s the highest compliment from a kid, right?
Variations You Can Try
Once you’ve mastered the basic spanish basque cheesecake, here are some fun twists:
Chocolate: Add 4 oz of melted dark chocolate to the batter. Life-changing.
Matcha: Whisk in 2 tablespoons of matcha powder. I saw this at a bakery and had to try it at home.
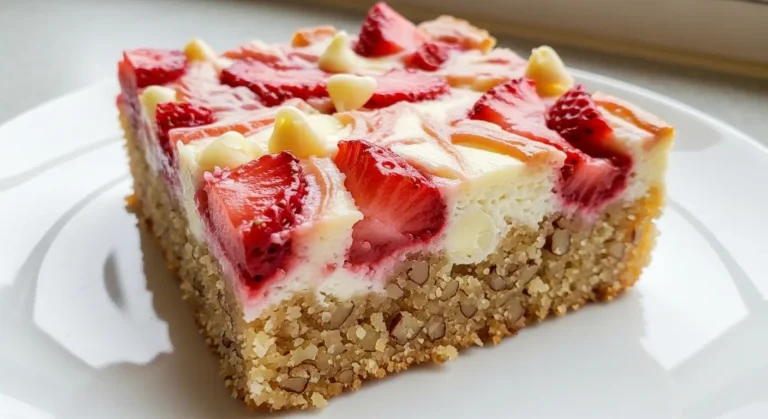
Berry swirl: Drop spoonfuls of strawberry or raspberry jam on top before baking and swirl with a knife. Gorgeous and tasty.
Orange zest: Add the zest of one orange to the batter for a subtle citrus note.
I haven’t tried the basque cheesecake no bake versions people keep asking me about. Honestly? I feel like the high temperature baking is what makes this special. But if you try it, let me know!
Common Questions About This Recipe
Why is my basque cheesecake too jiggly? You probably didn’t bake it long enough. It should still wobble in the center, but the edges should be set.
Can I make this ahead? YES. Actually, it’s better the next day. The flavors develop and the texture sets perfectly.
What if the top isn’t dark enough? Turn on your broiler for the last 2-3 minutes. Watch it like a hawk though. It goes from perfect to actually burnt really fast.
Do I really need heavy cream? I tried making it with half-and-half once. It worked but wasn’t as rich and creamy. Heavy cream is worth it.
Why This Is My Go-To Dessert Now
Here’s why I make this best basque cheesecake recipe at least once a month: it LOOKS impressive but it’s actually super easy. No fancy technique, no precision required, no decorating skills needed.
When people see that dramatic burnt top and cracked surface, they think you spent hours on it. In reality, it’s like 15 minutes of actual work and then just waiting.
Plus? It feeds a crowd. One cheesecake serves 10-12 people easily. I brought it to a potluck last month and three different people asked for the recipe.
And can we talk about how there’s no crust to make? That alone saves so much time. I used to stress about getting graham cracker crusts perfect. With this basque burnt cheesecake recipe, you literally just line a pan with parchment and pour in the batter.
Final Thoughts
If you’ve never tried making a basque cheesecake with caramelized top before, this is your sign to do it. Yes, it looks weird when it comes out of the oven. Yes, you’ll probably think you did something wrong the first time. But stick with it.
That first bite when everything comes together—the slight bitterness of the burnt top, the rich creaminess of the center, the way it literally melts on your tongue—it’s worth every failed attempt.
Just maybe turn your smoke alarm off before you start. Or at least warn your roommates/family that things are about to get smoky. Trust me on that one.
Now go make this and tell me how it turns out! Seriously, I love hearing about other people’s experiences with this recipe. Did yours crack differently? Did you try any flavor variations? Drop a comment because I’m always looking for new ideas.
Happy baking! And remember—if it looks burnt, you probably did it right 😊