Apple Cheesecake Bars: The Fall Dessert That Saved Thanksgiving
So, Apple Cheesecake Bars became my thing after I volunteered to bring dessert to Thanksgiving and then completely panicked two days before. I wanted something that wasn’t just “another pie” but also wouldn’t require me to be a pastry chef.
Four batches later (one fell apart, one was too sweet, one was… we don’t talk about batch three), I finally nailed these creamy apple cheesecake bars. And honestly? They’re now more popular than the actual turkey at our family gatherings.
Table of Contents
How I Stumbled Into Making the Best Apple Cheesecake Bars
Look, I’m gonna be honest—I saw something similar at a bakery and it was like $45 for a small pan. Forty-five dollars! For bars! I took a picture on my phone, went home, and decided I could figure it out myself.
First attempt at this apple cheesecake recipe was a disaster. Complete disaster. I tried using a regular pie crust and the whole thing just… disintegrated when I tried to cut it. My husband took one look at the carnage on the cutting board and asked if we should just order pizza instead.
Version two, I went with a graham cracker crust which was better, but the apple layer was too watery and made everything soggy. I’d used fresh apples without cooking them first. Rookie mistake.
By attempt three, I’d figured out I needed to cook the apples separately, use cream cheese at room temperature (game changer), and add a streusel topping because why not make it extra. These apple cream cheese bars finally looked like something you’d actually want to eat.
Why These Apple Dessert Bars Work (When Others Don’t)
Here’s the thing about most apple pie cheesecake bars recipes online—they either focus too much on being “healthy” and taste like cardboard, or they’re so complicated you need three days and a culinary degree to make them.
These fall cheesecake bars hit different because they’ve got distinct layers that actually work together. Graham cracker crust (easy), cream cheese layer (rich but not too sweet), spiced apple filling (the star), and a buttery streusel on top (because texture matters).
Plus, they’re way easier to serve than pie. No soggy bottoms, no structural failures when you cut into them, and people can just grab a bar and go. At potlucks, this matters more than you’d think.
The Ingredients for These Cheesecake Bars With Apples (Shopping Was An Experience)
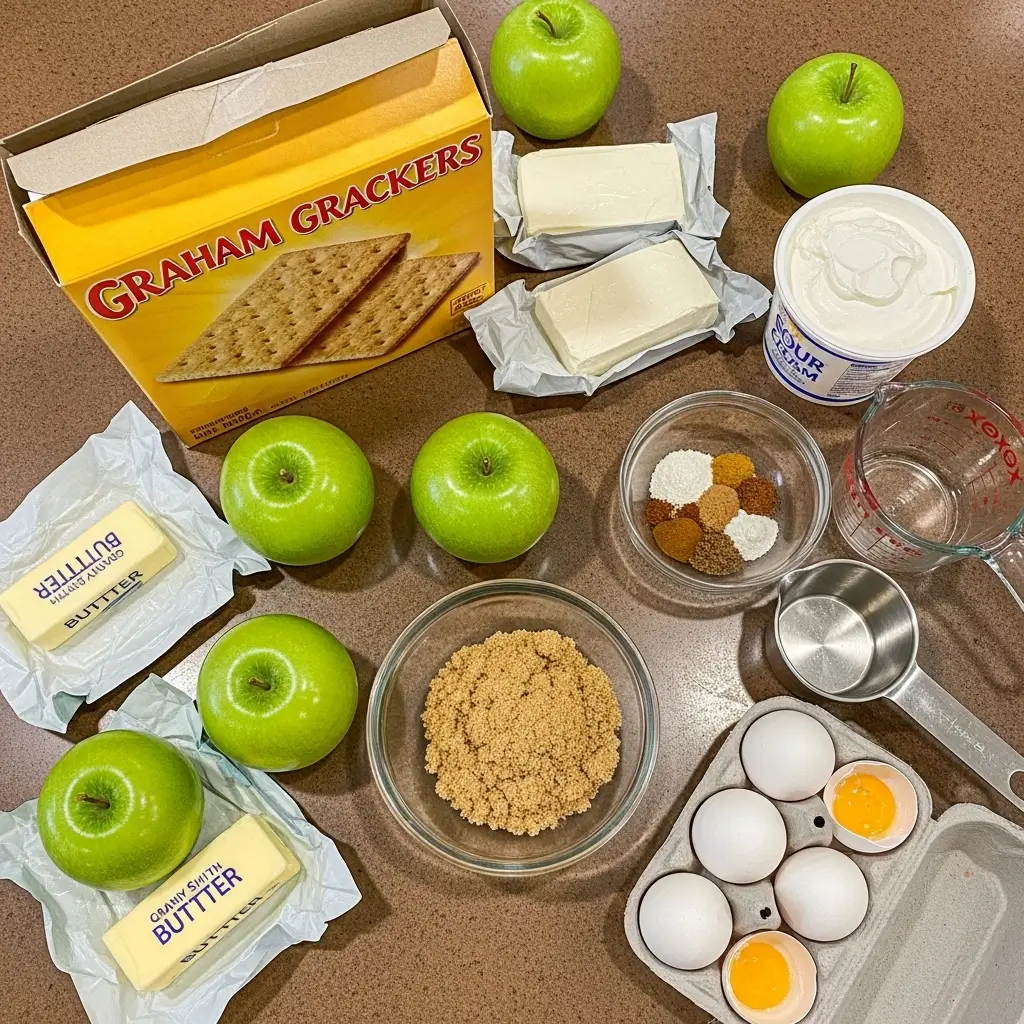
Alright, here’s what you need for these apple cream cheese squares. I’ve made enough batches to know exactly what works.
For the Graham Cracker Crust:
- 2 cups graham cracker crumbs (about 16 crackers, or just buy the box of crumbs)
- 1/4 cup granulated sugar
- 1/2 cup butter, melted (I use salted because I like the flavor)
For the Creamy Cheesecake Layer:
- 16 oz cream cheese, softened (this is TWO 8-oz blocks, don’t skimp)
- 1/2 cup granulated sugar
- 2 large eggs
- 1 teaspoon vanilla extract
- 1/4 cup sour cream (makes it extra creamy)
For the Apple Spice Filling:
- 3 large Granny Smith apples, peeled and diced (or Honeycrisp if you like them sweeter)
- 1/4 cup brown sugar
- 2 tablespoons butter
- 1 teaspoon cinnamon
- 1/4 teaspoon nutmeg
- 1 tablespoon lemon juice
- 1 tablespoon cornstarch mixed with 2 tablespoons water
For the Streusel Topping:
- 1/2 cup all-purpose flour
- 1/3 cup brown sugar
- 1/4 cup cold butter, cubed
- 1/2 teaspoon cinnamon
Real talk: Don’t use pre-grated cheese… wait, wrong recipe. But seriously, use BLOCK cream cheese, not the spreadable kind. The spreadable stuff has different moisture content and will mess up your bars.
Also about the apples—I tried this with Red Delicious once because they were on sale. Big mistake. They turned to mush. Granny Smith or Honeycrisp are your friends here.
How to Make These Easy Creamy Apple Cheesecake Bars Recipe
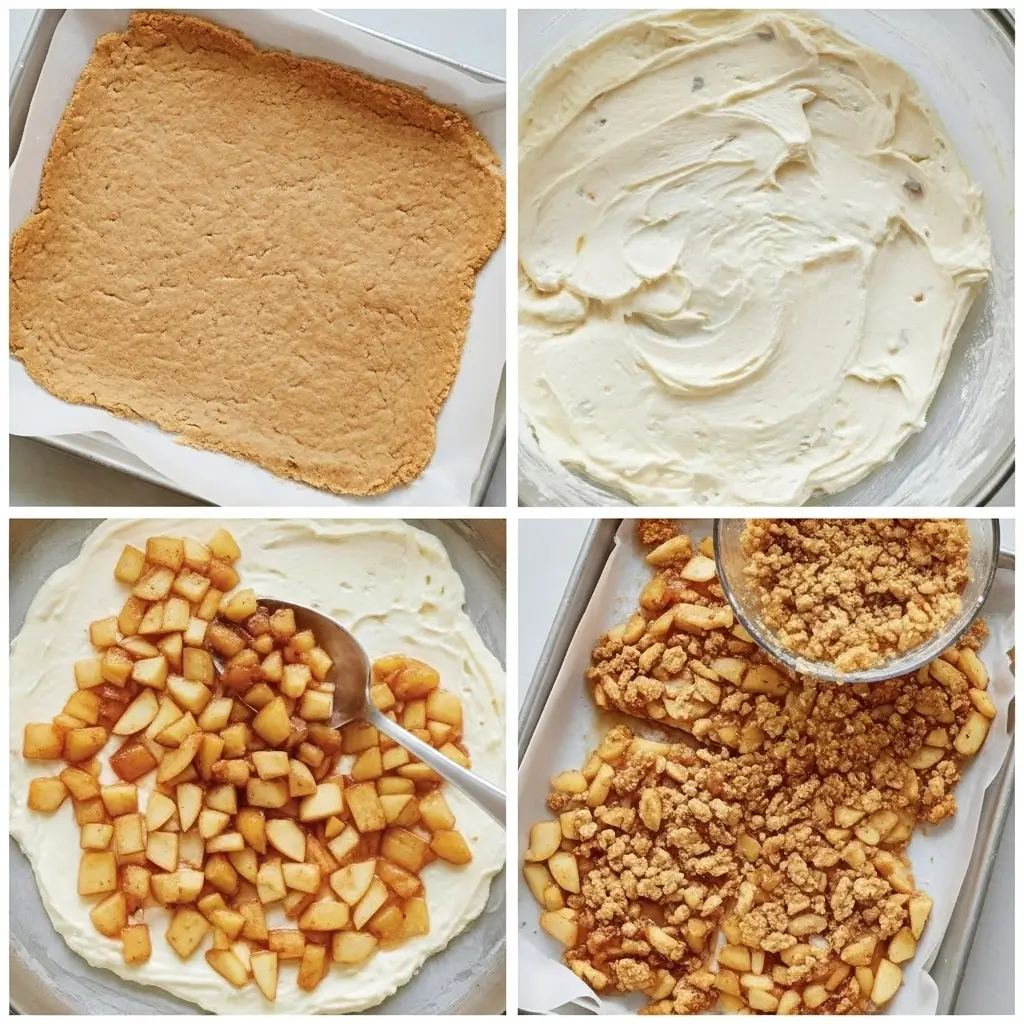
Step 1: Preheat and Prep Preheat your oven to 350°F. Line a 9×13 inch baking pan with parchment paper, leaving some overhang so you can lift the bars out later. (I always forget this step and regret it when I’m trying to pry bars out with a spatula.)
Step 2: Make the Crust Mix graham cracker crumbs, sugar, and melted butter in a bowl until it looks like wet sand. Press firmly into the bottom of your prepared pan. And I mean FIRMLY. Use the bottom of a measuring cup or glass to really pack it down.
Bake for 10 minutes. Set aside to cool while you make the other layers.
Step 3: Cook Those Apples This is the step that makes or breaks your apple crumble cheesecake bars. Heat butter in a large skillet over medium heat. Add your diced apples, brown sugar, cinnamon, and nutmeg.
Cook for about 8-10 minutes, stirring occasionally, until the apples start to soften but aren’t complete mush. Add the lemon juice and the cornstarch mixture. Stir for another minute until everything thickens up.
Remove from heat and let cool. This cooling step is important—if you put hot apples on the cream cheese layer, bad things happen. (learned this the hard way)
Step 4: The Cream Cheese Layer Make sure your cream cheese is actually room temperature. Like, soft enough that you can press a finger into it. If it’s cold, microwave it for 10 seconds at a time.
Beat cream cheese and sugar together until smooth and fluffy. Add eggs one at a time, beating after each. Then add vanilla and sour cream. Mix until it’s all silky and gorgeous.
Pour this over your cooled crust and spread it evenly. It’ll be thick, so take your time.
Step 5: Add the Apple Layer Once your cooked apples are cooled (wait, did I mention they need to be cool?), spoon them evenly over the cream cheese layer. Try to distribute them somewhat evenly, though mine never looks perfect and it’s fine.
Step 6: Make the Streusel In a small bowl, mix flour, brown sugar, and cinnamon. Cut in the cold butter with a fork or your fingers until it’s crumbly and looks like… well, crumbs. Sprinkle this all over the top of the apples.
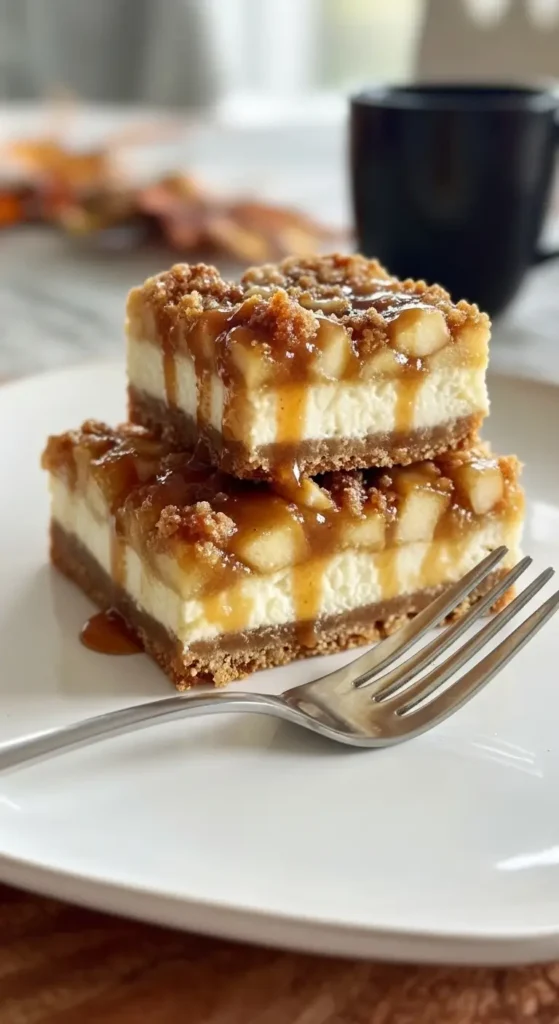
Step 7: Bake These Bad Boys Bake at 350°F for 35-40 minutes. The edges should be set but the center might still look slightly jiggly. That’s okay—it’ll firm up as it cools.
Step 8: The Hardest Part—Waiting Let the pan cool completely at room temperature, then refrigerate for at least 4 hours. Preferably overnight. I know, I hate waiting too. But if you try to cut these while they’re warm, you’ll have a melted mess.
Once fully chilled, lift out using the parchment overhang and cut into bars. I usually get 16-20 bars depending on how generous I’m feeling.
Real Talk About These Apple Spice Cheesecake Bars
Room temperature matters: Cold cream cheese will have lumps. Room temp cream cheese is smooth and dreamy. Plan ahead and leave it out for an hour.
Apple variety is crucial: I’ve tried this with basically every apple variety. Granny Smith gives you that tart contrast, Honeycrisp is sweeter. Don’t use Red Delicious or Golden Delicious—they get mushy and weird.
The cooling situation: Each layer needs time. Rushed cooling = soggy bars. I usually make these the night before I need them.
Storage: Keep these in the fridge. They’ll last about 5 days, though mine never make it past day 3. You can freeze them too—just wrap individually in plastic wrap.
Making These Apple Cheesecake Dessert for Thanksgiving
First time I made these for Thanksgiving, my sister-in-law (who usually brings some fancy French dessert nobody understands) asked for the recipe. That’s when I knew I’d made it.
They’re perfect for fall desserts because they’ve got all those warm spices and apple flavor, but the creamy cheesecake layer keeps them from being too heavy after a big meal. Plus, you can make them ahead, which is basically mandatory for Thanksgiving cooking.
My aunt, who’s made the same pumpkin pie for 40 years, actually said these might be better than pie. She whispered it like it was a secret, but I heard her.
When Your No Fail Apple Cream Cheese Dessert Bars Fail Anyway
Crust is too crumbly: You didn’t pack it hard enough or didn’t use enough butter. Next time, really press down like you’re mad at it.
Cheesecake layer cracked: Your oven was too hot or you overbaked them. The center should still be slightly jiggly when you take them out.
Apples made everything soggy: You didn’t cook them first or you added them while they were still hot. Both are problems.
Can’t cut clean bars: They’re not cold enough. Stick them back in the fridge for another hour. Also, use a sharp knife and wipe it clean between cuts.
Why These Creamy Apple Cheesecake Bars With Cinnamon Beat Store-Bought
Remember those $45 bars from the bakery? These cost maybe $12 to make and you get twice as much. Plus, you can control the sweetness, make them as apple-heavy as you want, and actually know what’s in them.
My neighbor tried them and asked where I bought them. When I said I made them, she literally didn’t believe me until I showed her the recipe. Best compliment ever, honestly.
Even my teenage son, who claims to hate “fancy desserts,” has been caught sneaking these from the fridge at 11 PM. If that’s not a ringing endorsement, I don’t know what is.
The Honest Truth About This Apple Pie Cheesecake Bars With Graham Cracker Crust Recipe
These aren’t quick. Between all the layers and the cooling time, you’re looking at a half-day commitment. But the actual hands-on work is maybe 30 minutes, and most of that is just waiting for things to cool.
Are they worth it? For holidays, special occasions, or when you want to impress people? Absolutely. For a random Tuesday night? Maybe just eat some apple slices with peanut butter and call it good.
But when you pull these out at a gathering and people’s eyes light up, and someone asks “did you really make these?” and you get to say yes with that casual confidence… yeah, it’s worth every minute of waiting.
Happy baking! (And may your cream cheese be room temperature and your patience plentiful)