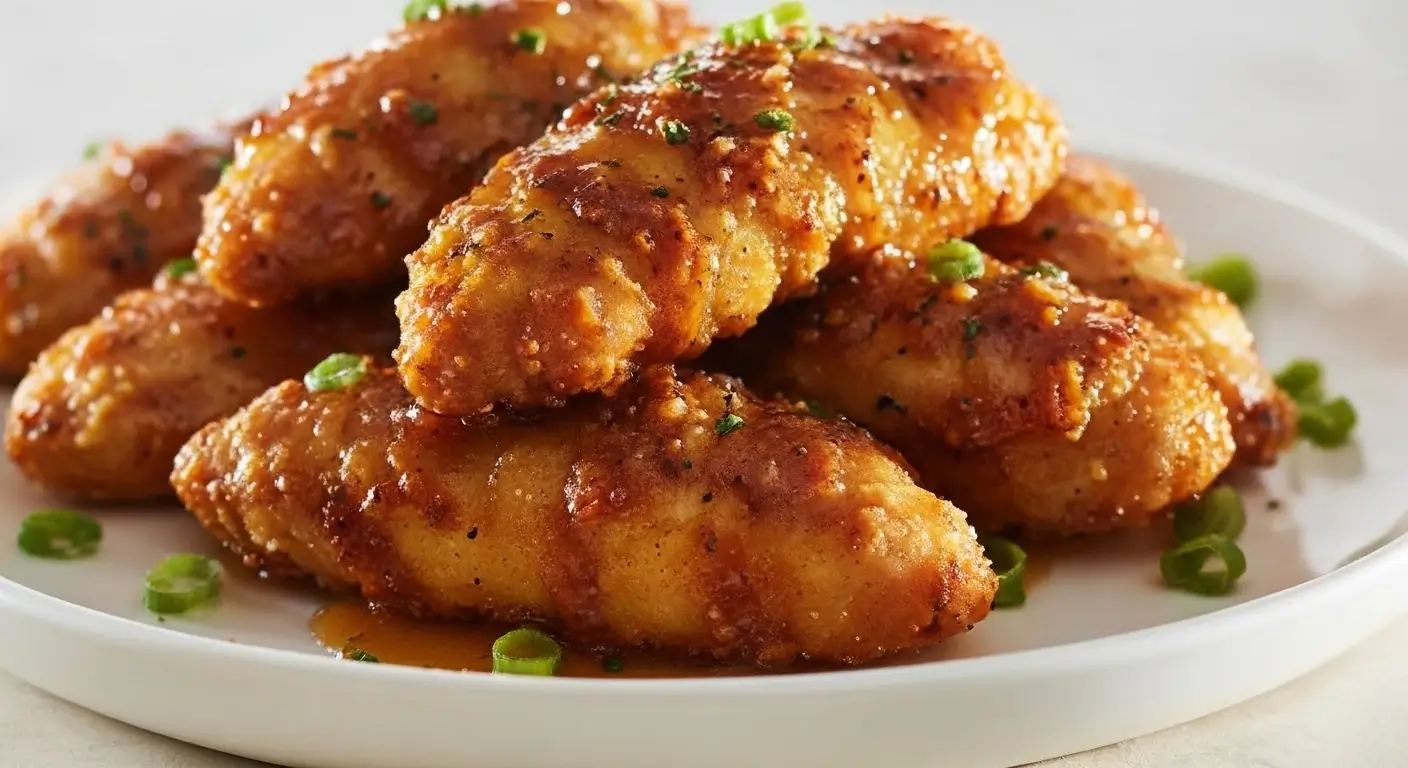
Air Fryer Honey Butter Garlic Chicken Tenders
Everyone keeps asking for this recipe, so here goes nothing. I’ve been making these Air Fryer Honey Butter Garlic Chicken Tenders for about six months now, and they’ve basically become a weekly staple in our house because my kids are obsessed and honestly? I don’t blame them.
But let me tell you, the first time I tried making these was a complete disaster. I thought I could just wing it (pun intended) and threw some chicken in the air fryer with whatever sauce I had lying around. The result? Dry, flavorless chicken that even my dog turned his nose up at.
Look, I’m gonna be honest with you—I’m not usually the person who gets excited about chicken tenders. They always seemed kind of basic to me, you know? But this honey butter garlic combination changed everything.
Table of Contents
How These Air Fryer Honey Butter Garlic Chicken Tenders Became a Thing
So this whole obsession started when I was scrolling through Instagram at like 11 PM (don’t judge) and saw someone posting about honey garlic chicken. I think it was one of those food accounts… or maybe it was my cousin’s post from a restaurant. Honestly can’t remember because late-night social media is basically a blur.
The next day I was at the grocery store, standing in the chicken aisle trying to remember what I saw, and I just grabbed some tenders and figured I’d figure it out at home. This was back when I was still getting used to my air fryer—you know, that phase where you try to cook literally everything in it just because you can?
First attempt was too sweet. Second attempt was too garlicky (and I’m saying this as someone who puts garlic in almost everything). Third time was the charm, and now my 10-year-old asks for these at least twice a week.
The key is—oh wait, I forgot to mention—you need to marinate the chicken first. Not for hours or anything crazy, but at least 30 minutes. I learned this the hard way when I tried to rush it once and the flavors just sat on top instead of actually getting into the meat.
Why These Air Fryer Chicken Tenders Actually Work
Here’s the thing about air fryer chicken—it’s so easy to mess up. Too high temperature and the outside burns while the inside stays raw. Too low and you get this weird, rubbery texture that’s just wrong on every level.
But when you get it right? The outside gets perfectly crispy and golden, and the inside stays juicy. And this honey butter garlic sauce? It’s like the perfect balance of sweet, savory, and that garlic punch that makes everything better.
I use real butter for this, not margarine. Life’s too short for fake butter, and the flavor difference is huge. My neighbor Sarah swears by using olive oil instead, but I tried it once and it just wasn’t the same.
And can we talk about how your house smells when these are cooking? It’s like someone bottled up comfort food and sprayed it everywhere. My husband can tell from the driveway when I’m making these.
What You Need for These Air Fryer Honey Butter Garlic Chicken Tenders
Shopping for this is pretty simple, which I love because I hate recipes that require ingredients I’ll never use again. Most of this stuff you probably have already, or at least you should because they’re cooking essentials.
For the Chicken:
- 2 pounds chicken tenderloins (or you can cut chicken breasts into strips—works fine)
- 1 cup buttermilk (this is crucial for tenderness—don’t skip it!)
- 1 teaspoon salt
- ½ teaspoon black pepper
- 1 teaspoon garlic powder
- 1 teaspoon onion powder
For the Coating:
- 1½ cups panko breadcrumbs (I use the Kikkoman ones because they’re consistently good)
- ½ cup all-purpose flour
- 2 teaspoons garlic powder
- 1 teaspoon paprika (gives it that nice color)
- 1 teaspoon salt
- ½ teaspoon black pepper
- Cooking spray (the olive oil kind works best)
For the Honey Butter Garlic Sauce:
- 4 tablespoons butter (real butter, not margarine!)
- 4 cloves garlic, minced (I’m obsessed with garlic, so sometimes I use more)
- ⅓ cup honey (local honey if you can find it, but store brand works too)
- 2 tablespoons soy sauce (adds that umami depth)
- 1 tablespoon apple cider vinegar (trust me on this one)
- Red pepper flakes to taste (optional, but I always add a pinch)
Good luck finding decent chicken tenders at a reasonable price these days—they’re either crazy expensive or look questionable. I usually just buy chicken breasts and cut them into strips myself. Takes an extra five minutes but saves money and I know they’re fresh.
Making These Air Fryer Honey Butter Garlic Chicken Tenders (The Right Way)
Alright, let’s do this. And please read through everything first because timing matters here, especially with the sauce.
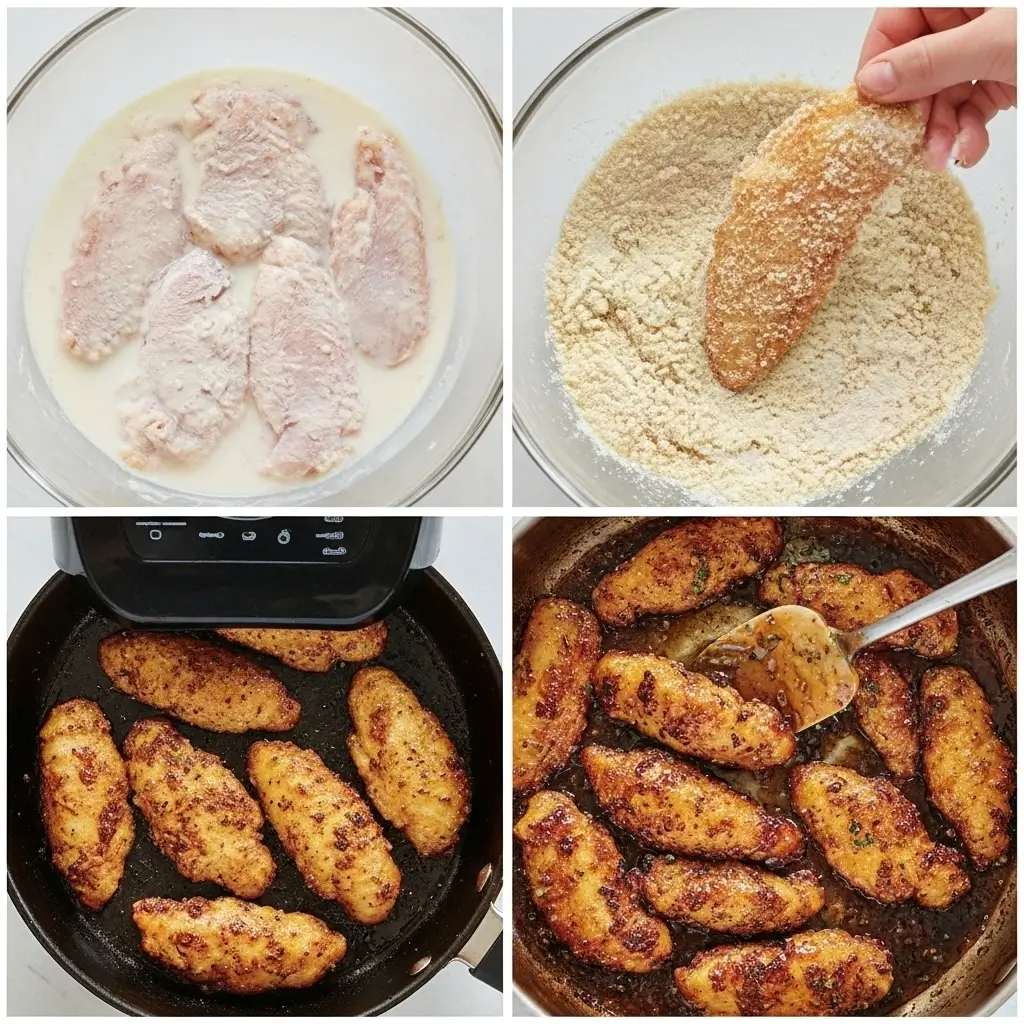
Step 1: Marinate the Chicken Mix the chicken with buttermilk, salt, pepper, garlic powder, and onion powder in a bowl. Cover and let it sit for at least 30 minutes. I usually do this in the morning before work and cook them when I get home. The longer you can marinate, the better—up to 4 hours is perfect.
Step 2: Set Up Your Coating Station While the chicken is marinating, set up two bowls. In one, mix flour with a pinch of salt. In the other, mix panko, garlic powder, paprika, salt, and pepper. This is your assembly line.
Step 3: Preheat and Prep Preheat your air fryer to 400°F for about 5 minutes. Don’t skip this—cold air fryers don’t give you that initial sear that makes the coating crispy.
Step 4: Coat the Chicken Take each piece of marinated chicken, shake off excess buttermilk, dredge in flour, then press into the panko mixture. Make sure both sides are well coated. I usually do this one at a time and place them on a plate as I go.
Step 5: Air Fry Magic Spray your air fryer basket with cooking spray. Place chicken tenders in a single layer—don’t overcrowd them or they won’t cook evenly. You’ll probably need to work in batches.
Spray the tops of the chicken with cooking spray (this helps them get golden brown). Cook for 12-15 minutes, flipping halfway through. They should reach 165°F internal temperature and be golden brown.
Step 6: Make the Honey Butter Garlic Sauce While the chicken is cooking, make your sauce. In a small saucepan, melt butter over medium heat. Add minced garlic and cook for about 1 minute until fragrant—don’t let it burn!
Add honey, soy sauce, apple cider vinegar, and red pepper flakes. Whisk everything together and let it simmer for 2-3 minutes until it thickens slightly.
Step 7: Toss and Serve Once the chicken is done, immediately toss it in the warm honey butter garlic sauce. Serve right away while everything is hot and crispy.

My Random Tips That Actually Matter
Temperature is everything with chicken. I always use a meat thermometer because nobody wants to serve undercooked chicken, and overcooked chicken is just sad and dry.
The buttermilk marinade is non-negotiable. It breaks down the proteins and makes the chicken incredibly tender. I’ve tried it without, and it’s just not the same.
Oh, and another thing—don’t make the sauce too far ahead. It’s best when it’s warm and freshly made. If you need to reheat it, do it gently over low heat and whisk it back together.
Actually, you know what? Sometimes I double the sauce recipe because my kids like to dip everything in it. And I mean everything—they’ve put it on rice, vegetables, even bread. Can’t say I blame them.
When Things Go Wrong (And They Sometimes Will)
Let me save you some frustration here. If your coating isn’t sticking well, make sure your chicken is wet from the buttermilk when you coat it, and press the panko on firmly.
If the chicken is browning too fast but isn’t cooked through, lower the temperature to 375°F and cook a bit longer. Every air fryer is different, so you might need to adjust.
And if you accidentally burn the garlic in the sauce (been there), just start over. Burnt garlic tastes awful and will ruin the whole thing.
The Reality of These Air Fryer Honey Butter Garlic Chicken Tenders
Are these the healthiest chicken tenders you’ll ever eat? Probably not. Are they way better than anything you’ll get from the frozen food aisle? Absolutely.
My kids prefer these to fast food chicken nuggets, which says something. My husband said they taste like something from a good restaurant, and he’s usually pretty stingy with compliments about my cooking.
The best part is that they’re ready in about 45 minutes total, including marinating time if you’re doing the quick version. That’s faster than driving to get takeout and way cheaper.
Leftovers keep well in the fridge for a couple days, though the coating won’t be as crispy when reheated. I usually just throw them back in the air fryer for a couple minutes to crisp them up again.
Final Thoughts on This Chicken Tender Adventure
Look, I’m not saying these Air Fryer Honey Butter Garlic Chicken Tenders will solve all your dinner problems or make you famous on social media. But they will make your family happy, and sometimes that’s exactly what you need on a Tuesday night when everyone’s tired and cranky.
If you try this recipe, let me know how it turns out! Seriously, I want to know if you discover any tricks or variations because I’m always looking for ways to make things even better.
And if you have picky eaters like I do, this might just be the recipe that gets them excited about dinner again. Worth a shot, right?
Happy air frying! (And may your chicken always be crispy and never dry.)
Serves: 4-6 people
Prep Time: 15 minutes (plus 30 minutes marinating)
Cook Time: 15 minutes
Total Time: About 1 hour
Pro tip: Make extra sauce and keep it in the fridge—it’s amazing on so many other things.