Okay, so I’ve been making pumpkin cookies for years and they always turned out… cakey. You know that fluffy, almost bread-like texture that’s just wrong for cookies? Yeah, that. Drove me absolutely crazy.
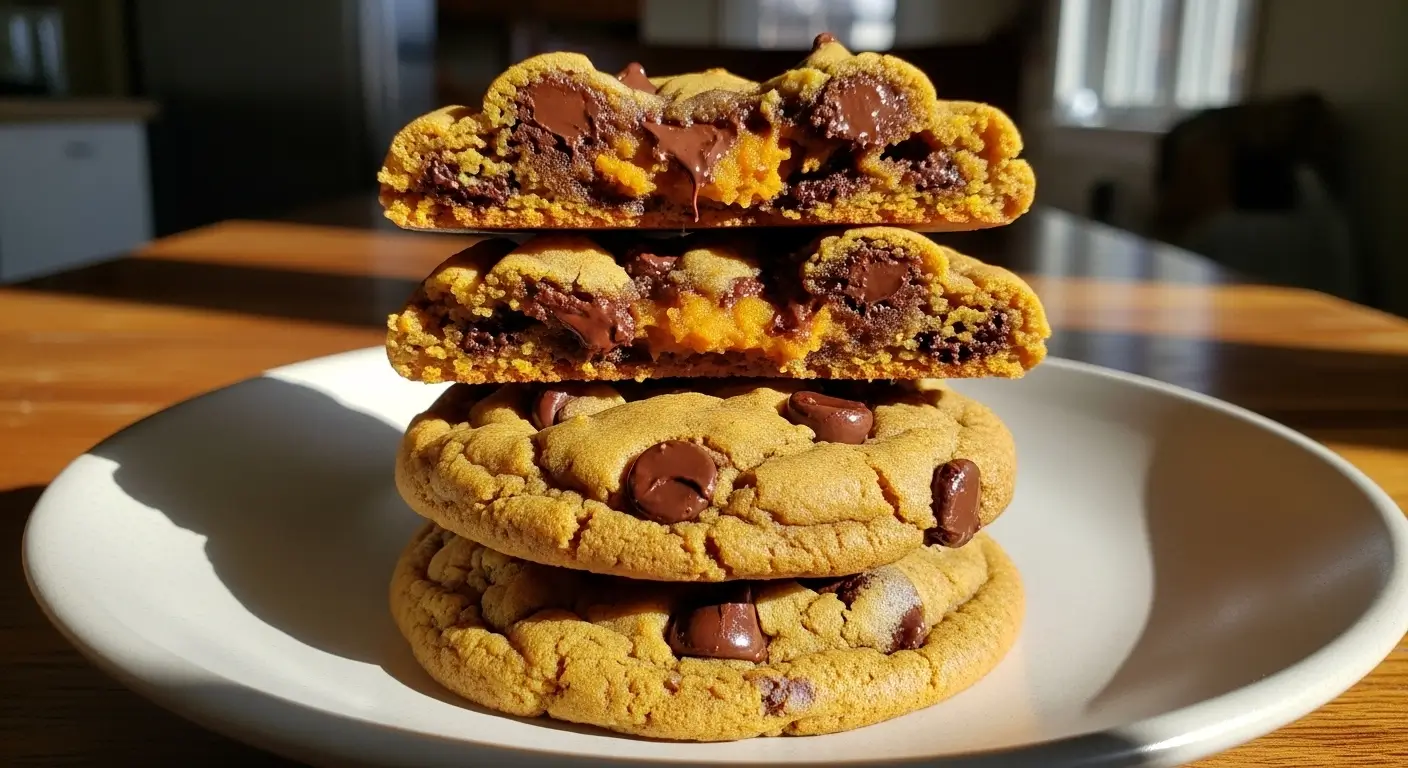
But then I discovered the secret to making brown butter pumpkin chocolate chip cookies that are actually CHEWY and not like little pumpkin muffin tops. Game. Changer. And honestly, it’s all about two things: brown butter (obviously) and blotting your pumpkin puree. Sounds weird, I know.
I think I’ve made this recipe like fifteen times in the past month and my family still isn’t sick of it, which is saying something because my teenager claims to hate “anything with vegetables” even though pumpkin is technically a fruit but whatever.
Table of Contents
Why These Are The Best Pumpkin Chocolate Chip Cookies
Here’s the thing about most pumpkin cookie recipes online—they lie to you. They promise soft and chewy but deliver cakey nonsense that tastes more like a health muffin than a cookie. Not these.
The brown butter is what makes these soft pumpkin cookies actually special. When you brown butter, you’re basically cooking the milk solids until they turn golden and nutty and smell like heaven. It adds this deep, almost caramel-y flavor that regular melted butter just can’t match. My neighbor Sarah tried these and literally asked if I put toffee in them. Nope, just brown butter doing its magic thing.
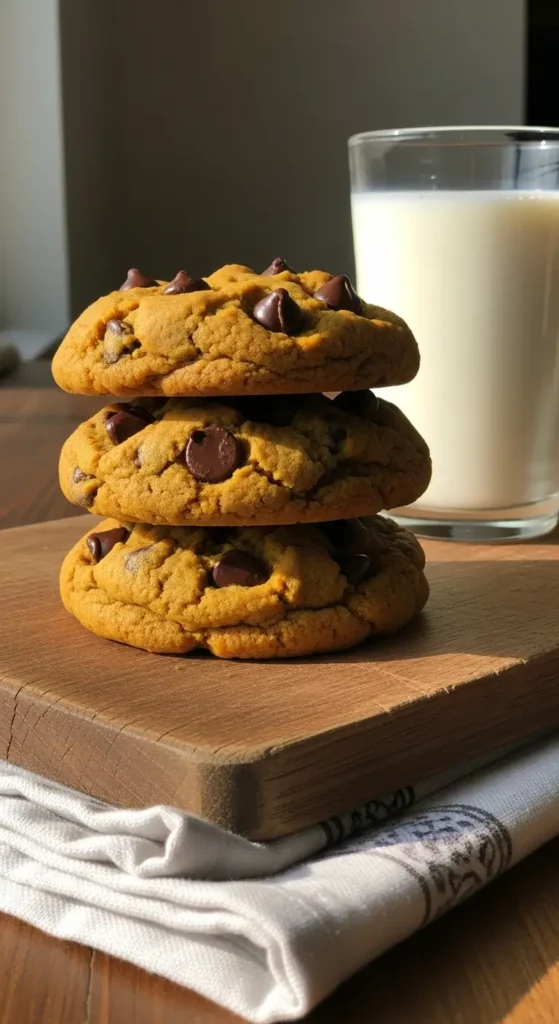
And the texture? Gooey in the middle, slightly crisp on the edges, thick and chewy throughout. These are bakery style pumpkin cookies but you made them in your kitchen wearing pajamas at 9 PM on a Wednesday. Not that I’ve done that or anything.
First time I made these was last October and I forgot to blot the pumpkin puree. The cookies spread into weird flat puddles and tasted like… moist sadness? Is that a flavor? Anyway, version 2.0 with properly blotted pumpkin was SO much better. Learn from my mistakes, people.
What You Need For Chewy Pumpkin Chocolate Chip Cookies
Shopping for this is pretty easy, but there are a couple of key things you absolutely cannot skip. Trust me on this.
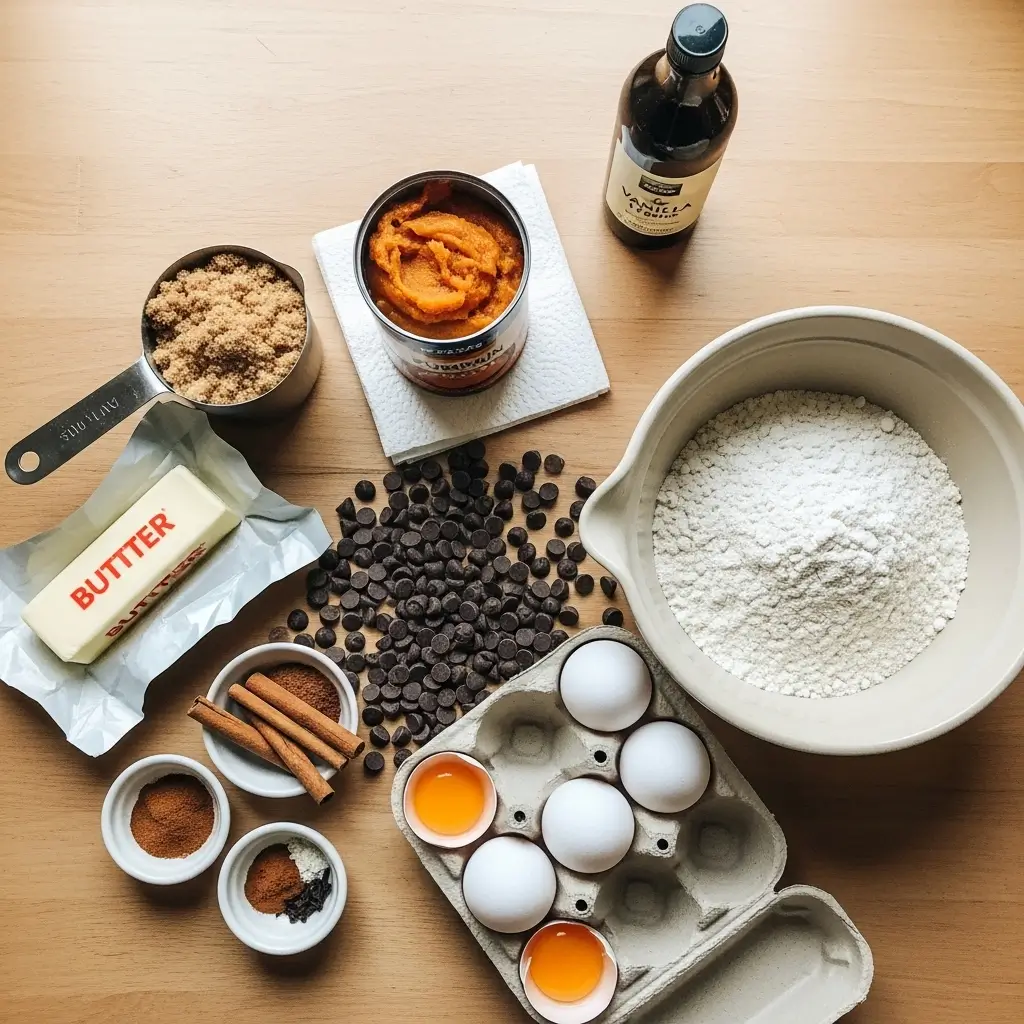
For the cookies:
- 1 cup (2 sticks) unsalted butter
- 1 cup dark brown sugar, packed (pack it HARD into the measuring cup)
- 1/2 cup granulated sugar
- 2/3 cup pumpkin puree (the canned stuff is fine—oh wait, I forgot to mention—blot this with paper towels!)
- 2 large egg yolks only (not the whole eggs, this is important)
- 2 teaspoons vanilla extract
- 2 cups all-purpose flour
- 1 teaspoon baking soda
- 1/2 teaspoon salt
- 1 teaspoon cinnamon
- 1/2 teaspoon pumpkin pie spice
- 1 1/2 cups chocolate chips (I use semi-sweet but dark chocolate works too)
- Extra chocolate chips for pressing on top (because we’re fancy)
Shopping note: Get real butter, not margarine. I tried this once with “buttery spread” when I ran out of actual butter and it was a disaster. The brown butter flavor was completely wrong and the texture was off. Just… don’t.
And about the egg yolks—using just the yolks instead of whole eggs is THE SECRET to avoiding cakey cookies. Egg whites add structure and make things fluffy, which is great for cakes but terrible for chewy cookies. Save your egg whites for scrambled eggs tomorrow morning or something.
How To Make These Fall Pumpkin Cookies
Preheat your oven to 350°F. Set a timer to actually turn it on because I always forget this step until I’m halfway through mixing everything.
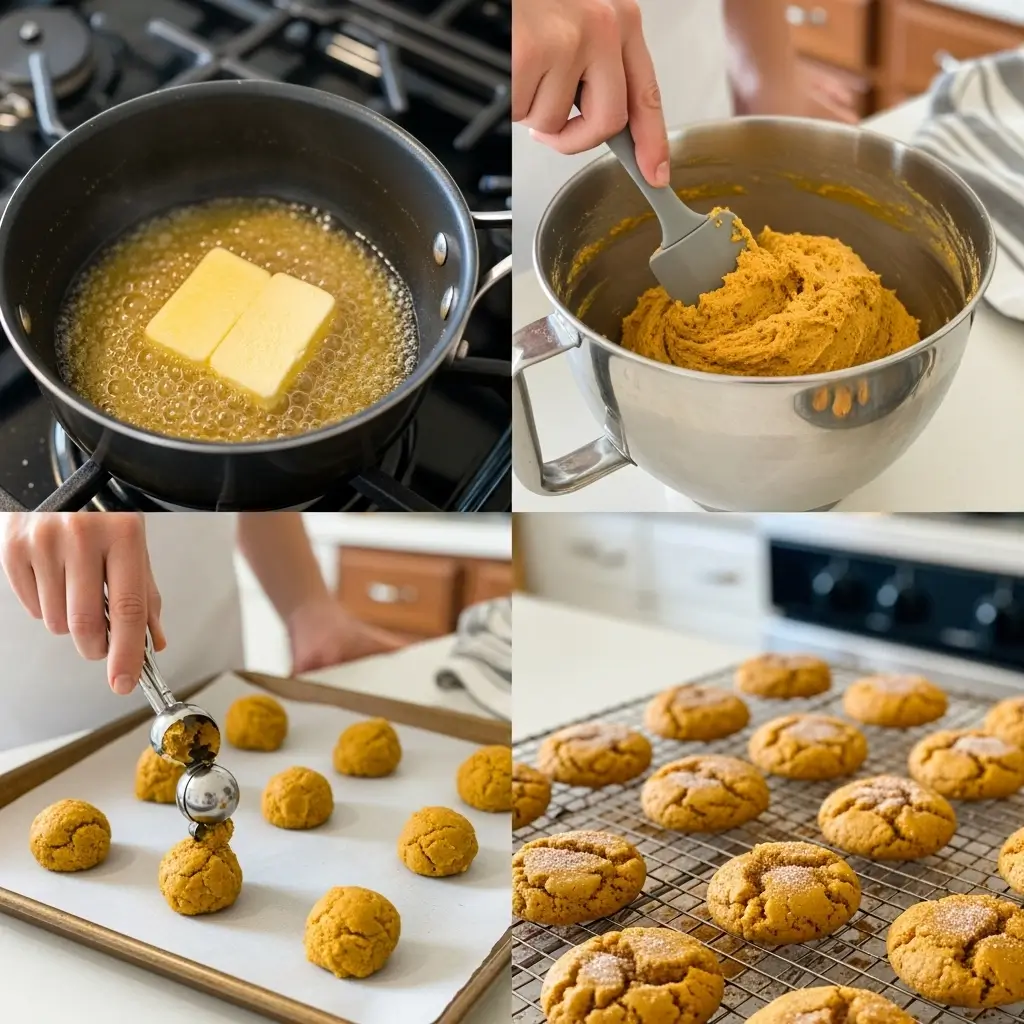
Step 1: Brown the butter (don’t skip this)
Put your butter in a light-colored saucepan over medium heat. Why light-colored? Because you need to SEE when the butter starts turning brown. Using a dark pan is how you end up with burnt butter, which tastes like regret.
Let the butter melt completely, then keep cooking it while stirring constantly with a wooden spoon or spatula. It’ll start to foam and bubble and smell amazing. After about 5-7 minutes, you’ll see little brown bits forming on the bottom of the pan and the butter will turn this beautiful amber color.
As soon as it smells nutty and looks golden brown, take it off the heat immediately. Pour it into a heatproof bowl, making sure to scrape all those brown bits from the bottom—that’s where the flavor lives. Let it cool for about 30 minutes. You want it liquid but not hot.
Pro tip: If you burn the butter (been there), just start over. Burnt butter tastes bitter and gross and will ruin your cookies. Ask me how I know.
Step 2: Blot your pumpkin
While the butter’s cooling, take your pumpkin puree and dump it onto a few layers of paper towels. Cover it with more paper towels and press down gently to absorb the excess moisture. This is SO IMPORTANT for getting chewy cookies instead of cakey ones.
You don’t need to get every single drop of moisture out, just pat it a few times until the paper towels aren’t completely soaked anymore. This takes like 2 minutes and makes such a huge difference.
Step 3: Mix the wet stuff
In a large bowl, whisk together your cooled brown butter and both sugars until it looks like clumpy wet sand. This texture is exactly what you want.
Add your blotted pumpkin, egg yolks, and vanilla. Whisk everything together until it’s smooth and combined. It should look kind of glossy and smell incredible.
Step 4: Add the dry ingredients
In a separate bowl (I know, more dishes, sorry), whisk together your flour, baking soda, salt, cinnamon, and pumpkin pie spice.
Dump the dry ingredients into the wet mixture and use a spatula to fold everything together. Mix just until you don’t see dry flour anymore. DO NOT overmix or your cookies will be tough. I learned this the hard way after making cookies that had the texture of hockey pucks.
Fold in most of your chocolate chips, saving some for the top.
Step 5: Chill (this is not optional)
Cover the bowl with plastic wrap and stick it in the fridge for at least 1 hour. I usually do 2 hours or even overnight because it makes the cookies even better. The dough needs to firm up and the flavors need time to meld together.
I know waiting is annoying but if you skip this step, your cookies will spread too much and be flat and weird. Just… trust me. Go watch an episode of something on Netflix and come back.
Step 6: Scoop and bake
Line two baking sheets with parchment paper. Use a large cookie scoop (about 2 tablespoons of dough) to portion out your cookies. Space them about 3 inches apart because they will spread a little.
Press a few extra chocolate chips on top of each cookie dough ball. This is what makes them look bakery-style fancy even though they’re super easy.
Bake for 11-13 minutes. The edges should look set and slightly darker, but the centers will still look soft and underdone. That’s exactly what you want! They’ll continue cooking on the hot pan after you take them out.
Step 7: The hardest part (waiting again)
Let the cookies sit on the baking sheet for at least 5 minutes before moving them to a cooling rack. If you try to move them too soon, they’ll fall apart because they’re still too soft.
Actually, these thick pumpkin chocolate chip cookies taste even better after they’ve cooled completely and sat for a few hours. The texture gets chewier and the pumpkin flavor gets stronger. If you can resist eating them all immediately, let them sit uncovered on the counter for a few hours before serving.
Tips For Perfect Brown Butter Pumpkin Cookies
On the brown butter: Watch it like a hawk once it starts foaming. The difference between perfectly browned and burnt happens in like 30 seconds. Stay by the stove and don’t wander off to check your phone.
On the pumpkin: Make SURE you’re using pure pumpkin puree, not pumpkin pie filling. I grabbed the wrong can once and my cookies were way too sweet and spiced. Had to throw out the whole batch.
On chilling: The longer you chill, the better the cookies. I’ve made these with just 1 hour of chilling and with overnight chilling, and overnight is definitely better. The flavor develops and the texture is more consistent.
On baking: Every oven is different. My oven runs hot so my cookies are done at 11 minutes. Yours might need 13 minutes. Start checking at 11 minutes and don’t let them get too brown or they’ll be dry.
On storage: Keep these in an airtight container at room temperature. They stay soft and chewy for like 5 days. You can also freeze the baked cookies for up to 3 months, or freeze the cookie dough balls and bake them fresh whenever you want.
Why These Homemade Pumpkin Chocolate Chip Cookies Are Worth It
Because they’re actually GOOD. Like, genuinely delicious, not just “good for pumpkin cookies.” The brown butter adds this nutty, caramel-y depth that makes them taste expensive and complicated even though they’re pretty simple.
They’re thick and gooey and packed with chocolate chips and just the right amount of pumpkin spice without tasting like a Yankee Candle. My husband, who usually only eats chocolate chip cookies (boring), admitted these might be his new favorite.
And honestly, making these no cakey pumpkin cookies is so satisfying after years of trying recipes that promised chewy but delivered fluffy nonsense. Finally figured it out and now I’m sharing it with you.
These are perfect for fall baking, Thanksgiving dessert tables, or just making on a random Tuesday because you’re craving something cozy and delicious. The brown butter makes them feel fancy but they’re actually pretty easy once you’ve done it once.
Make a batch this weekend and let me know what you think! And if you have any tweaks or additions that make them even better, drop them in the comments because I’m always trying to perfect my cookie game.
Happy baking! 🍪🎃
[Recipe_Card]